New Photography Student Kit Enhanced
writer: russell j.t. dyer; posted: jul 2009; revised: apr 2018
Equipment Mentioned
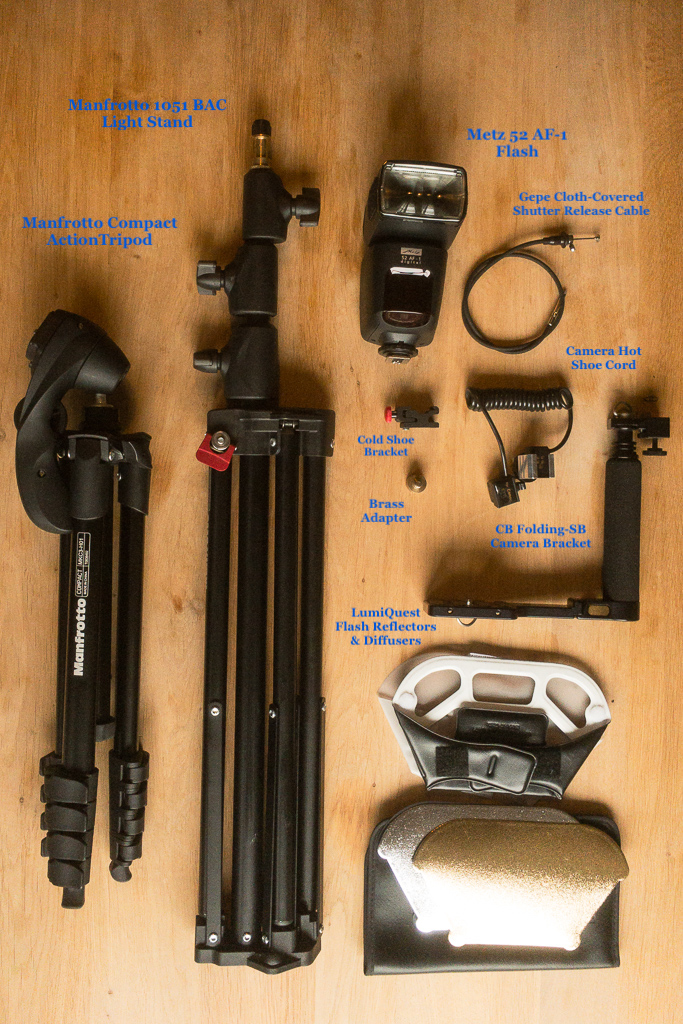
metz 52 AF-1 flash;
manfrotto tripod;
manfrotto 1051 bac light stand;
lumiquest promax defussers;
canon oc-e3 hot shoe cord;
cb camera flash bracket; and
gepe shutter release cable
This is the third article in a series in which I explain what equipment a new photography student will need to take good photographs and to learn more about photography. In the first article of this series I presented some items that the student will need: a camera and a few minor accessories. In the second article I recommended buying a small tripod, a reflector disc, and a gray-card as a slight expansion of the first level. In this third article, you will move up to another level of photography, to the level of studio photography to include portrait photography. This will require purchasing an external flash, as well as related equipment and accessories. However, the cost is not prohibitive.
Upgrade Kit
The defusser set comes with multiple colored inserts (i.e., white, silver, gold). This will help to soften the light coming from your external flash, as well as alter its color.
Standing Taller
In the previous article in this series, I suggested that you buy a small table top tripod to carry in your camera bag and for specific uses in dark settings. For this next level, I recommend that you buy a taller tripod. To do portraits and other studio photography, you’re going to need it.
You’ll set up your camera and lights and your model — that’s what we call the person who sits still for you while you take their picture. When you’re ready you will then take your first shot. It will be terrible. You’ll immediately spot something wrong like there’s something behind the model that shouldn’t be there. You’ll remove it and take the shot again and see other problems. This will go on for over a hundred shots — make sure your model is prepared for this tedium. The model will naturally squirm and shift on you. So the more many things that you can lock down, the better: hence, the tripod.
As I keep saying about all photography equipment, buy a good one that will last and that you won’t outgrow. Since a compact camera is small, it would be silly to buy a heavy duty tripod at this stage. However, you don’t want to make the mistake of wasting money on a tripod that has many shortcomings that will cause you not to use it. I recommend you get a tripod like the Manfrotto Compact Action Tripod. It has spiked feet for when you set up on a shag carpet (but not so spiked that it will tear the carpet) or outside on the grass or a dirt surface. It also comes with rubber protectors to put over the spiked feet so you won’t damage your floors when using indoors and to stop it from sliding. It weighs only five pounds and folds up to only about two feet long. So even when you’ve moved up to DSLR cameras and buy a heavy duty tripod for serious studio work, this tripod can be your preferred tripod when you’re traveling.
External Flash
Using a Flash Bracket
Although your digital compact camera probably has a built-in flash, it’s not going to be as good as having a more powerful external flash. First of all, an external flash can be positioned not to be in line and close to the lens. This is what causes people to have red eyes in photographs. Second, with an external flash you can point it at the side of the face while still having the model face the camera. This makes for better results. Third, with an external flash you can modify the light in many ways: bounce the flash off of a wall or ceiling; cover the flash head with a diffuser for softer tones; or add some other attachment to change the coloring of the light.
A good flash will have many features: the ability to reduce the intensity of the flash, focus the beam depending on the focal length of the lens, angle the flash in different directions for the best effect. It will also include a simple defusser to disburse the light. This scatters the light, making it softer so that shadows around the model won’t have a rigged edge. Nevertheless, the simple defusser that is attached to a typical external flash isn’t as good as one that you can add to a flash when desired. The flash diffuser I use (i.e., Lumiquest Promax System) works nicely and folds up and fits in the back pocket of my camera bag without taking up much space.
When deciding on an external flash, just because your camera is small, don’t buy the smallest and cheapest one. Buy a flash that will be effective and that you can use for many years, even when the time comes when you upgrade to a DSLR camera. Consider the features that a better flash offers. Some you may need when you decide to buy a second, more powerful flash. For instance, you may want to trigger both flashes at the same instance. If you have an old flash that has the feature necessary to operate as a slave to another flash, you can do it. So, spend the extra money for future growth
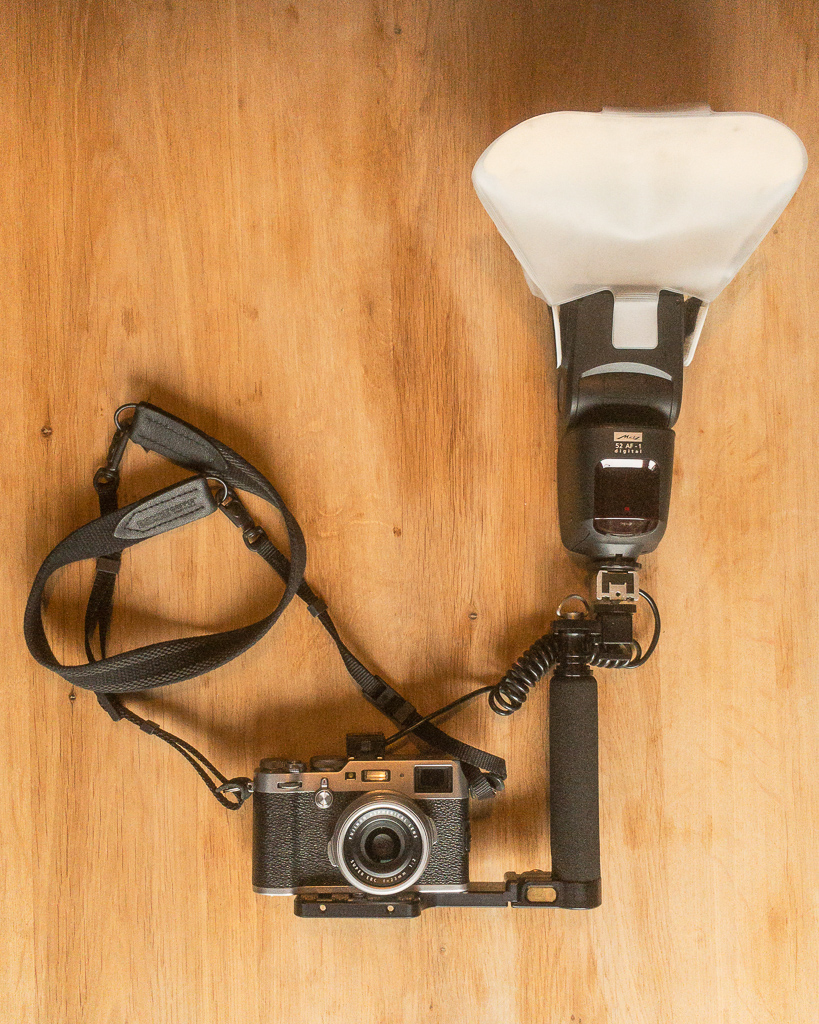
If you’re going to separate the flash from the camera and put it on a bracket (see photo), you will need a way to communicate with it. The simplest method that will also allow you to keep control in the camera, is to use an off-camera hot-shoe cord (Canon OC-E3 for Canon, or Nikon SC 29 for Nikon cameras). You can see the spiral cord in the photograph. These cords aren’t usually very long, but they’re long enough length for basic portrait photography. They cost plenty: about $60 in the U.S.
Taking a Stand
Once you have an external flash, the game of gear acquisition can continue smoothly as it’s the most expensive component at this level. Your external flash can easily be attached to the top of your compact camera, but if you bought a decent one as I suggested, it will make the camera top heavy and it won’t allow you to be very creative with the lighting. Instead, I recommend that you buy a Manfrotto light stand. If you hadn’t already noticed from other articles on this site, I like Manfrotto’s products. They make sturdy and well made products. They charge a bit more than some makers, but you won’t wish you had bought a better brand. Incidentally, they also distribute their products under the name of Bogen Imaging. A good stand of theirs is the Manfrotto 5001B 74-Inch Nano Stand. It folds up into a small size and it doesn’t weight much. Even when you become more advanced in photography, there will be times when you’ll appreciate the lighter stand for simple shoots so that you can lighten your load. A better stand is the Manfrotto 1051 BAC (see photo). It folds flatter, doesn’t have as wide a base, and is air cushioned inside — which is good if you have a lighting device attached and accidentally let go of it while changing the height.
Pulling it Together
Once you’ve purchased these few additions, you’ll be ready to set up a small and temporary studio. I like to use my living room. I purposely tried to have only small and lightweight furniture in my living room so that I can quickly clear the room. The only large item is the sofa, but it slides easily and can be moved to one end of the room, out of the way. Another possibility is a garage or basement if you have one. You’ll have to be good about keeping it clean and clear of mess. Where you place your camera and flash will take time. Check out some of the <a href=’/book-category-studio.list’>books on studio lighting</a> listed in the books section of this site. Get a good book on subject and be prepared to spend many hours experimenting.