Configuring the Leica M11-P
writer: russell j.t. dyer; posted: Jul 2024; revised: Jul 2024
As part of my goal of simplifying the use of my digital camera (i.e., Leica M11-P), to use it like a film camera, I’ve set the camera’s menus in advance of using it and turned off anything I don’t need. This article goes through the menus and explains the settings which are relevant to that mindset.
Overall, there are a few things I want to eliminate and set. First and foremost, I want to turn off the liquid chrystal display (i.e., LCD). It’s the biggest distraction when taking pictures. Also, I don’t want anything extra. I disable whatever isn’t necessary.
Now that I’ve finished setting everything in the menus, I don’t need the LCD while shooting. I have an Oberwerth half-case made specifically for the Leica M11-P. It has a removable back that attaches by magnets. It covers the LCD and back buttons so I don’t think about them. When I’m shooting, I control the camera from the top buttons and the lens. I don’t need or miss the LCD after just a week of using the camera. If I do need it, though, it’s easy enough to remove the cover to check or change something. When I’m done, I put it back.
Status Screen
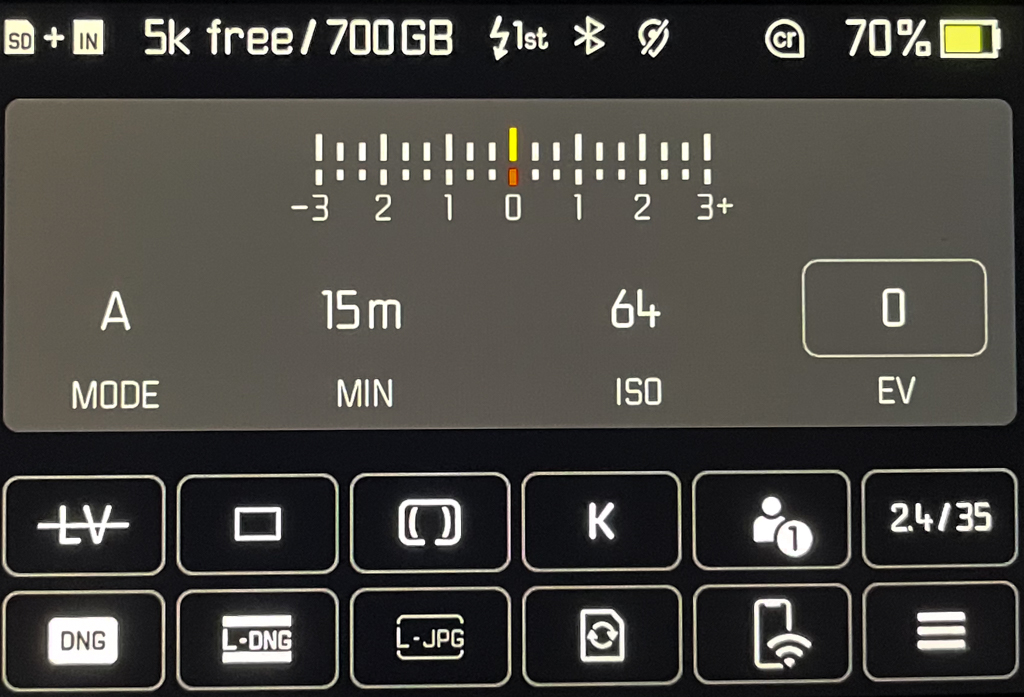
Leica M-11P - Status Screen
To get to the menus on a Leica M11-P, you press the MENU button at the bottom left of the LCD a couple of times. The first screen to appear is the status screen shown here. This shows the status of a few items, and several key settings and how they’re set. The LCD is a touch screen, so you can tap on one of these items to change them. I never do that. I set things one time in the Main Menu: you access it by clicking MENU again, or by touching the ≡ icon at the bottom right of the screen.
Before going onto the Main Menu, take a look at the status screen. It shows at the end of the first row of squares that I have an f/2.4 35mm lens attached to the camera, which is correct. For the line of exposure values running horizontally in the middle, it indicates that the camera is in A Mode, or Aperture Mode. That means that the shutter duration dial is on A, and it will be adjusted automatically based on the lens aperture settings — and based on at what the ISO sensitivity is set. We really should just refer to A as Automatic Shutter since it’s no longer based only on aperture.
The next value is the shutter duration: it’s set to the maximum time of 15 minutes because I had the lens cap on when I took this photo of the screen. That value will change to something more realistic and useful when the cap is removed and the camera pointed at something reflecting light, and as the aperture is adjusted.
Next you can see I have the ISO sensitivity at 64. Then there’s the EV, the exposure value or variance. It’s at 0 because I rarely use that. When I do, though, I configured the thumbwell to access EV, quickly. I press it, then roll it left or right. It activates the LCD for that moment. I hate it.
It doesn’t have the aperture setting because that’s controlled manually on the lens, which is a mechanical lens with no communications with the camera. The camera guesses at the lens openning based on what it sees from inside the camera looking down the lens barrel. It uses that guess for setting the shutter duration, and notes it on the image file.
Favorites
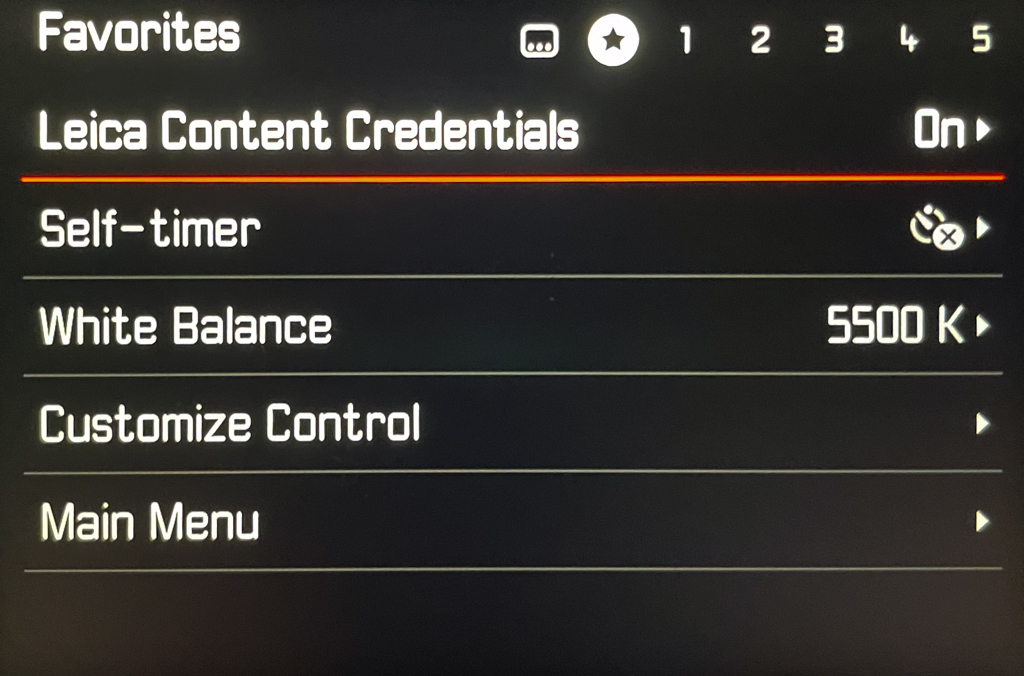
Leica M-11P - Favorites Menu
The next screen is the Favorites menu, which is just a list of main menu items to which you want to have quick access. At a minimum, whether you want it or not, the first item is the Leica Content Credentials. That’s a feature available first and only on the M11-P. They seem proud of that. I have no use for it since I don’t sell my photos.
You can add other items by selecting the Customize Control option and picking what you want to include. I put a two items here, but I never use the Favorites list. The Main Menu choice brings you to the main menu, which is composed of five pages. They’re listed here next.
Main Menu, Page 1
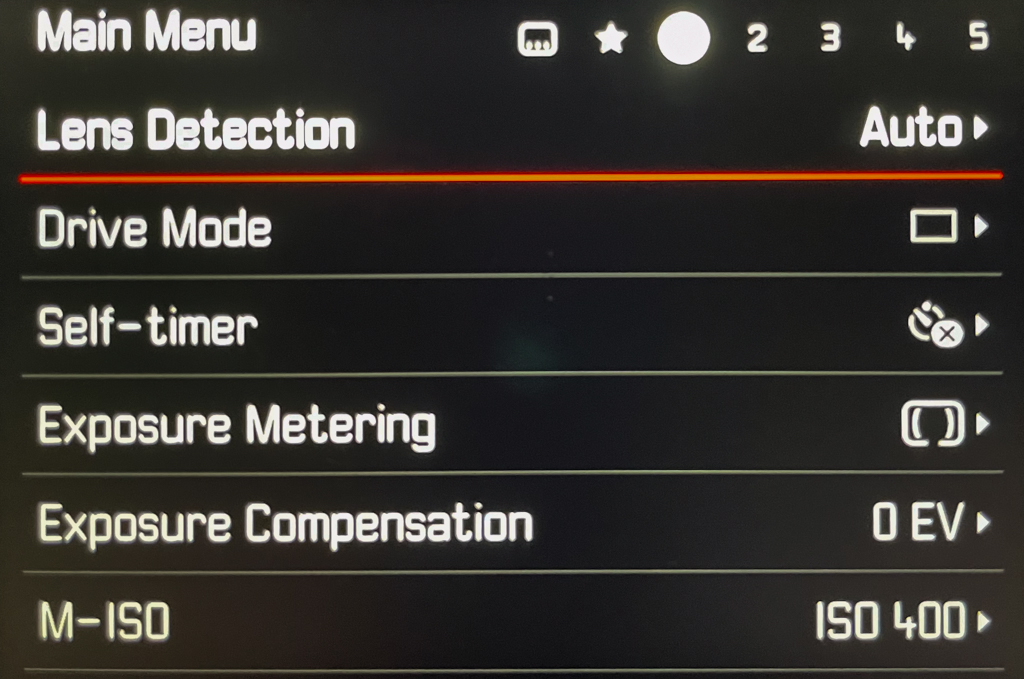
Leica M-11P - Main Menu, Page 1
There are a few things I set on the first page of the Main Menu. The rest I ignored or disabled.
Lens Detection
Since I have a recently made lens with the six-bit encoding (see Encoded), I put Lens Detection to Auto. This way it makes adjustments for the lens’ peculiarities, and it records which lens I used in the image file.
Drive Mode
Unless you want to take multiple photos rapidly, which I don’t recommend except for photographing moving subjects at active events (e.g., sport competitions, kids playing), set this to Single for one shot per press.
Exposure Metering
I use Center-weighted, but you might prefer something else. Spot and Highlight-weighted really don’t matter unless you’re using Live View for focusing. You shouldn’t do that. You should use only the optical viewfinder. In fact, with a manual lens, I don’t know how you can do otherwise.
Exposure Compensation
Set this to 0 EV. You can change this elsewhere for special situations. But normally you can make this adjustment later in post production on your comoputer.
The default for Self-Timer is fine: I rarely use the timer. The M-ISO is the maximum ISO setting when using automatic ISO. I set ISO manually with the knob on the top of the camera, so setting it here doesn’t matter.
Main Menu, Page 2
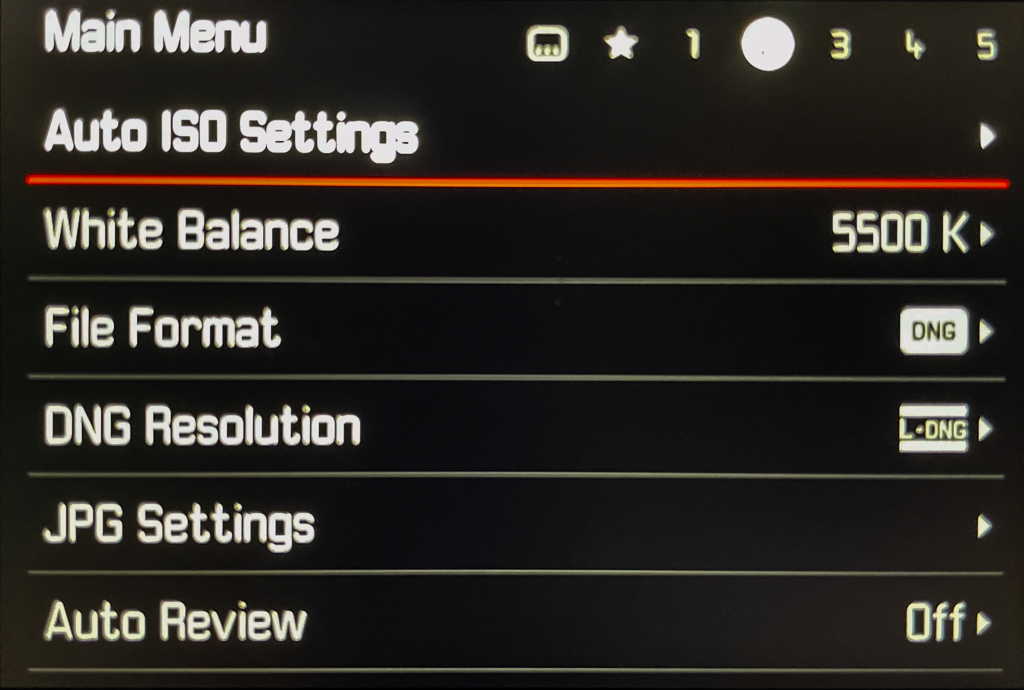
Leica M-11P - Main Menu, Page 2
Since I use the ISO control knob on the top of the camera, it overrides whetever I set digitally in the menus. So I ignore Auto ISO Setting. Because I save images in DNG, it doesn’t really matter how I set white balance since colors are changed easily in post production using Adobe Lightroom. However, I prefer to use a specific color temperature, 5500 Kelvin as a good starting point. As for JPG Setting, I don’t save images to jpeg format, so that setting doesn’t apply. I mention that in the first item below:
File Format
Set this to DNG (i.e., digital negative), which is like RAW on other cameras. There’s no need for JPG (i.e., jpeg): it takes space on the memory card and it can be generated later on your computer using Adobe Lightroom or Apple Aperture for images you decide to post or print.
DNG Resolution
I have this set to L-DNG (60 mp), the highest resolution. Some people set this to 36mp or 18mp to save space on the memory card. They worry the memory card will fill too fast. The M11-P will take a high capacity memory card, as much as two terrabytes. I have a one-terrabyte card and didn’t fill it after a week of shooting on vacation in France. Plus, I have extra cards. Incidentally, although I bought a spare battery — which is expensive — I never needed it. After a week of shooting on vacation, my battery is down to only 70%.
White Balance
Set this either to Auto or to Color Temperature with a value of 5500K. If you’re using DNG, though, the white balance doesn’t really matter since it can be changed on your computer.
Auto Review
Set this to Off. If this is set to On, every time you take a picture, the LCD will come on and show you the results. This is the biggest distraction when taking pictures. It removes you from the moment. It’s like when you’re having an interesting conversation with someone and you suddenly look down at your phone and start checking messages. It ruins the conversation.
Main Menu, Page 3
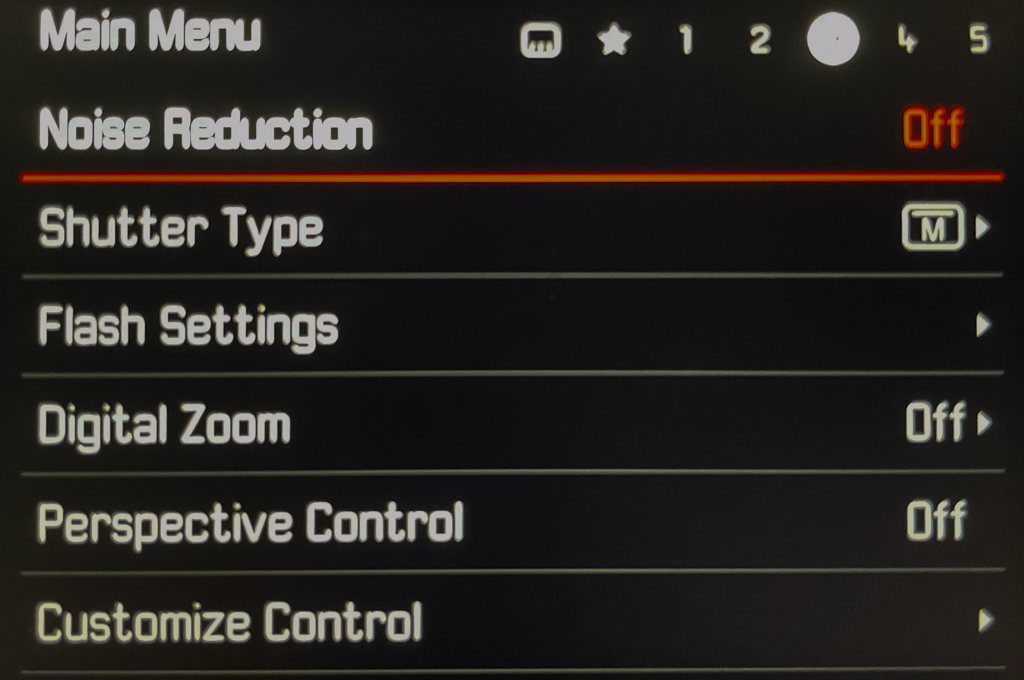
Leica M-11P - Main Menu, Page 3
The items on the third page of the Main Menu don’t matter to me, except one which is explained below. Since I don’t normally use a flash, the default for Flash Settings is fine. As you can see from the screenshot, I set Noise Reduction, Digital Zoom, and Perspective Control to Off. Those are things I either don’t want, add overhead to the processing of an image on the camera, or I can do later in Adobe Lightroom. The Customized Control has a sub-menu with some choices I set, but will cover later.
Shutter Type
The best shutter type is Mechanical. Leica M-11P has an actual shutter. It opens quietly when you press the shutter release and closes again, exposing the image sensor for whatever shutter duration it was set. The other choice is to use an Electronic shutter. With this, no shutter is used: instead, the image sensor turns on and off as needed. This works like a telephone camera. It’s totally silent, but it’s not as good as a mechanical shutter. The difference is miniscule, but I don’t like it.
Main Menu, Page 4
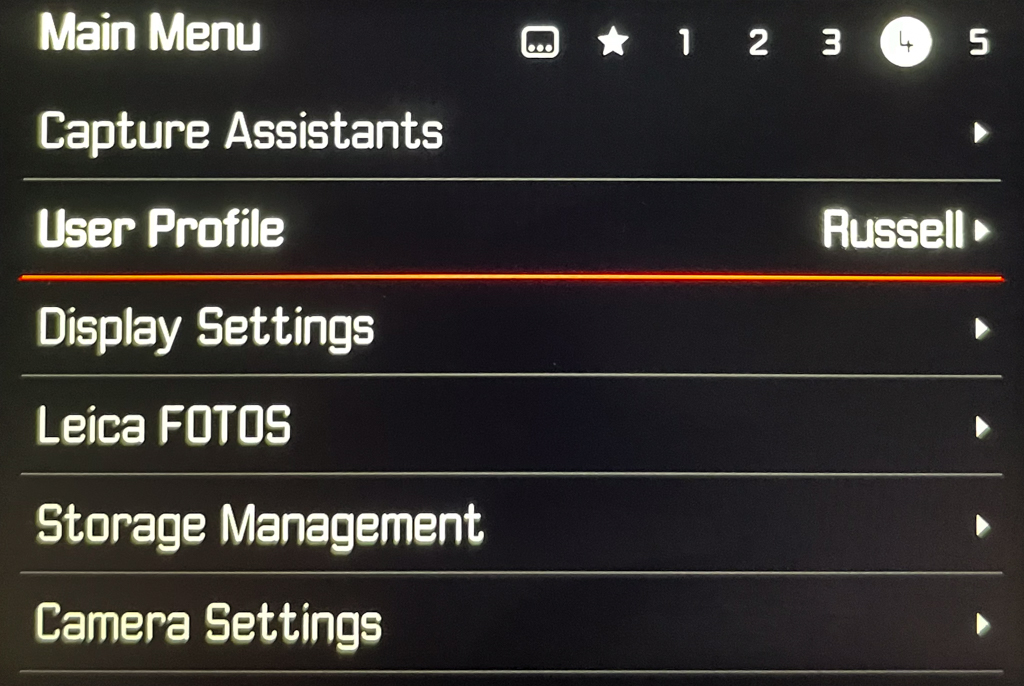
Leica M-11P - Main Menu, Page 4
On the fourth page, there are a few useful settings. I’m not quite sure the point of Capture Assistants, other than some recommended profiles and auto-focus settings. Leica FOTOS is for connecting the camera to Leica’s iPhone application for remotely controling the camera (i.e., with Live View) and for copying photos from the camera to your phone via WiFi. You can use it’s image management system, or copy the images from there to Adobe Lightroom. I’d rather remove the memory card and connect it to my computer and let Adobe Lightroom make the transfer directly. The card is easy to remove from the battery compartment at the bottom of the camera.
Camera Settings is where you set the date and file number information, the USB connector for charging, etc. These settings are something you do one time when you first get the camera and leave them alone afterwards.
User Profile
This is the last menu choice I made. When I finished making all of my changes to the Main menu, I selected the User Profile and went to the sub-choice of Manage Profiles. After renaming the first profile to my name, Russell, I clicked on Save as Profile and chose my profile as where to save the current settings. This way, if I make some changes to the menus on the fly, I can easily put the settings back to my preferences. Later, I may create another profile with settings for studio work and name it Studio. Then I can switch between my standard profile and my studio one, as needed. You can choose a different profile from the Status Screen: touch the screen where there’s an image of a person near the end of the second row of icons.
Display Settings
There are a few settings here. What’s important is to set EVF <> LCD to just EVF. This will keep the LCD off. You activate it when you need it by pressing the MENU or PLAY buttons. When you’re done using the LCD, when you start to take another photo, it’ll turn off again.
Storage Management
This allows you to tell the camera where to save image files that are created. I chose DNG files on the SD memory card, and if that’s full to the internal memory. There’s more details to the choices than that, but that’s basically what I chose.
Main Menu, Page 5
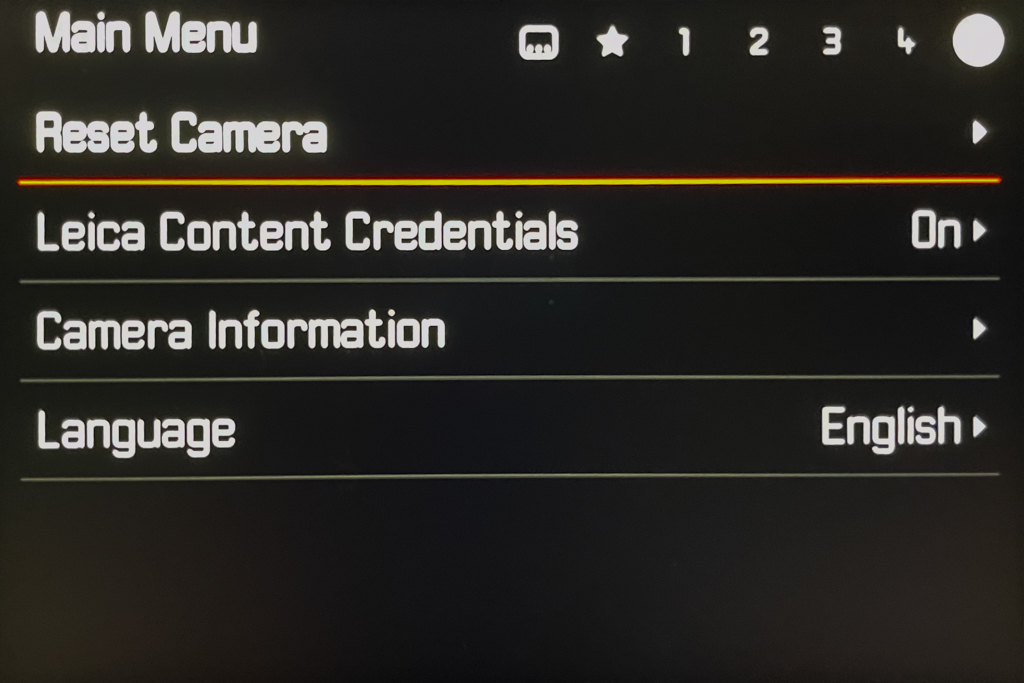
Leica M-11P - Main Menu, Page 5
There’s nothing much to do on the fifth page of the Main Menu, at least not once you first set it. Here you can put your name and other copyright information for images, and set the language used by the menus (e.g., English).
Under the Camera Information choice is where you’ll install the latest firmware from Leica. I did that when I first got the camera. Hopefully, they’ll add more improvements soon. There isn’t much I would like them to change, though.
Other Buttons
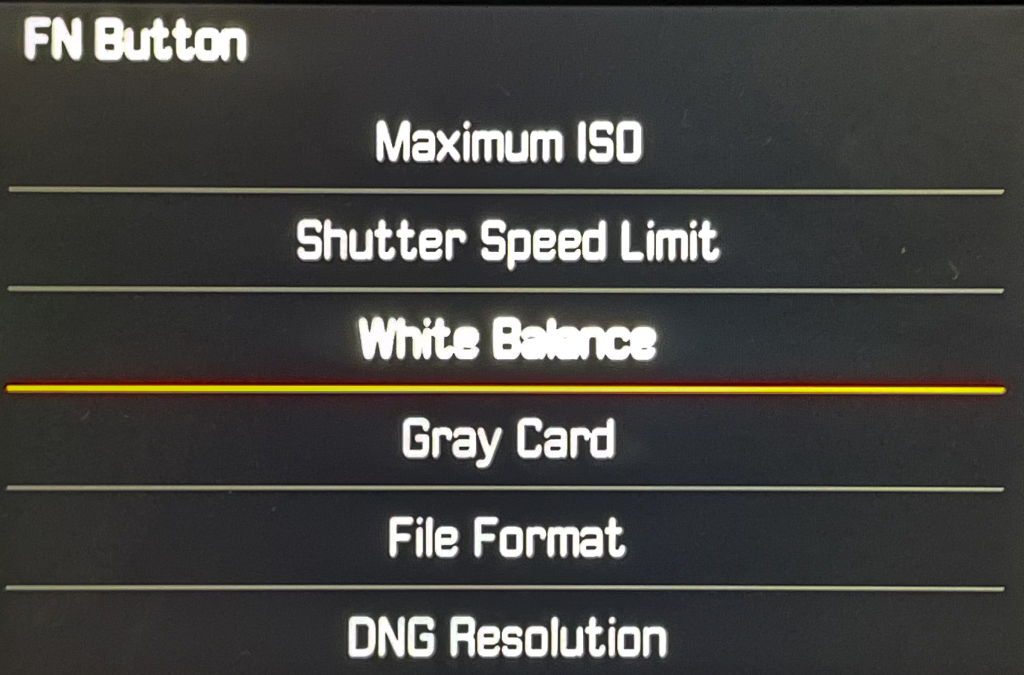
Leica M-11P - Function Button Choices
There are three buttons on the camera that can be customized: the FN button, the Thumbwheel, and the Function button. The FN button is located to the left of the LCD. If you hold it down for a few seconds, a menu will appear on the LCD of functions to which it may be set. I set it to White Balance in case I want to set that, which I never do now that I save files to DNG format. There isn’t anything else in the list I want to access easily.
The Thumbwheel is located on the back of the camera, at the edge of the top right corner. If you press it at the center of the wheel and hold it for a few seconds, a list of choices for it appears — ones that would use the Thumbwheel to adjust. I set it to Exposure Compensation. Again, with DNG files I don’t need it. But there have been times when I have used that feature on other cameras.
On the top of the camera, to the right of the shutter release is a small button that you may not have noticed. That’s the Function button. Hold it down for a few seconds to get choices for its use. I configured it for Flash Settings. That’s something I would use in a studio situation. Otherwise, I don’t use it.