Using Hand Tools
writer: russell j.t. dyer; posted: Jul 2024; revised: Jul 2024

Leica M-11P camera;
Leica Summarit-M f/2.4 35mm lens;
Oberwerth half-case.
In another article I published here this month (i.e., New Camera, Old Feel: Leica M11-P), I described my decision to purchase a Leica M-11P camera. I mentioned wanting a digital camera that handles like a film camera. For me, this is important for good photographs and for enjoying photography.
The camera should be an extension of your hand and eyes, of your mind. You see something interesting or beautiful, you should be able almost immediately to capture what you see with the camera.
As a writer, I’ve learned a few core things about writing. Foremost, you have to know what you want to say and then say it. When taking pictures, you have to think about what you want to communicate, what you want to show, to portray in a photo and then press the shutter release. When that decisive moment occurs, as Henri Cartier-Bresson calls it, you can’t turn away from the scene and fiddle with the camera, scroll through the menus, and change settings. You have to be prepared to raise the camera, focus, and click.
Tthe camera has to be like a hand tool, not a complex power tool with lots to adjust. When a carpenter picks up a hammar to drive a nail, he doesn’t look at the hammar and think how to configure it. He just swings it at the nail. He needs to be familiar with the weight of the hammar, the type of nail he’s using and how to handle both so he doesn’t hit his fingers, so he doesn’t bend the nail, so he doesn’t mar the wood. It has to be a natural act when joining the wood, making the nail and the pieces of wood one — with the carpenter guiding it and insynch with tool and materials. The result is his art.
Preparation
For me, controls need to be grouped and the key ones accessible using manual knobs or dials. Preparation, simplicity, and familiarity are essential. With the Leica M11-P, preparation can be done in two groups: menu settings; and initial exposure settings.
Menu Settings
First, right after I bought this camera, I went through the user manual to make sure I understood what every phyical button and control does. I pressed and twisted everything. This began the process of becoming familiar with the tool, getting to know the weight of it.
Next, while sitting at home with no plans to take pictures, I reviewed each menu setting and made changes for my preference. Many remained at the default values, but there are a several I changed. I list my settings in a tutorial, Configuring the Leica M11-P. See that article for details on how I set the menu options and why.
Once the menus are set, there should rarely be a reason to turn on the LCD again – especially not while out shooting pictures.
Exposure Base
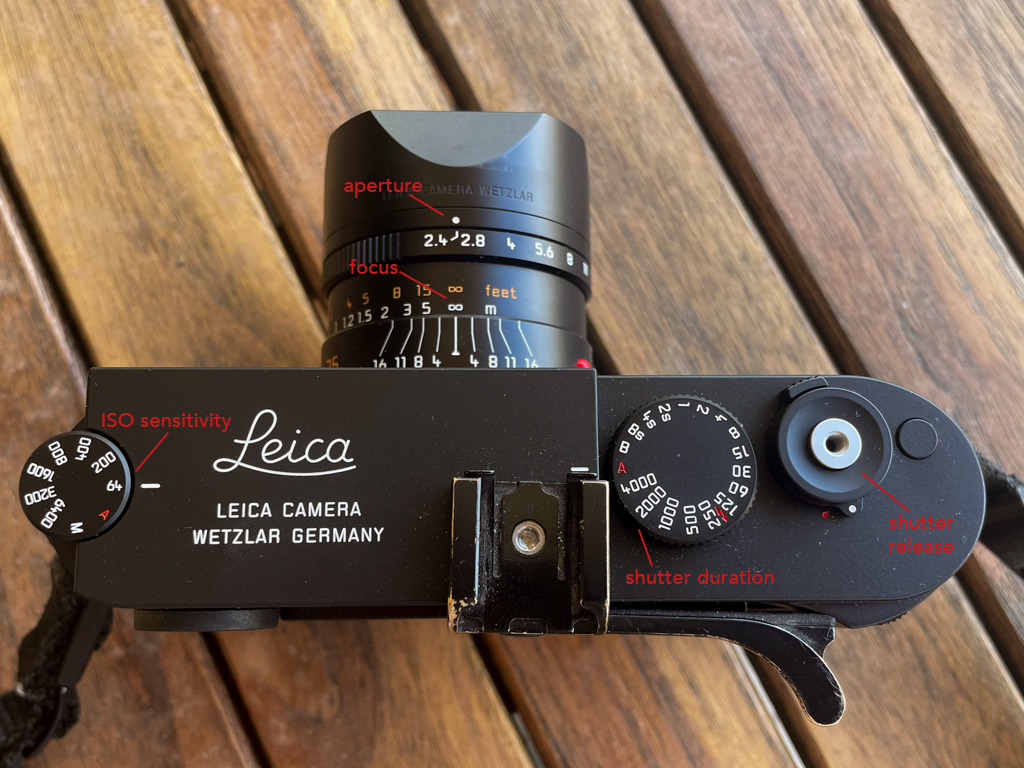
Top of Leica M-11P (click to enlarge)
The next group of things to set on the camera are simpler and fewer. They all relate to exposure. You can see the dials and knobs for these in the shot here of the top of the camera. Click on it to enlarge.
First thing I set is the same for almost all situations: the shutter duration. I don’t want to determine it — it takes too much skill or testing to get it right. So I set the dial for it to the red A. The camera will set automatically the shutter duration based on the light coming into the lens through the aperture.
The two exposure items I set manually are based on the environment in which I will be shooting. If I will be outside with bright sunlight, I will set the ISO sensitivity to 64. If it’s overcast, cloudy outside, I might set the ISO to 200. There’s nothing in between those two on the manual control. If I’m indoors with plenty of light from windows, I put the ISO on 200. If there’s dim light from lamps only, I’ll use 400 and rarely 800, but never more than that. I find the images are too grainy if I go higher.
The last exposure adjustment I make before starting to shoot anything is the lens aperture. That’s located on the lens. On a sunny day, I’ll put that to f/8, f/11, or f/16. Indoors, I’ll do f/5.6 or f/4. I’ll go down to f/2.4 if I’m photographing something fairly flat and not moving (e.g., a wall with a painting) or I’m photographing my wife who knows how to stay still for a photo and I want a tigher depth of field around her (i.e., to make the background blurry).
In the Moment
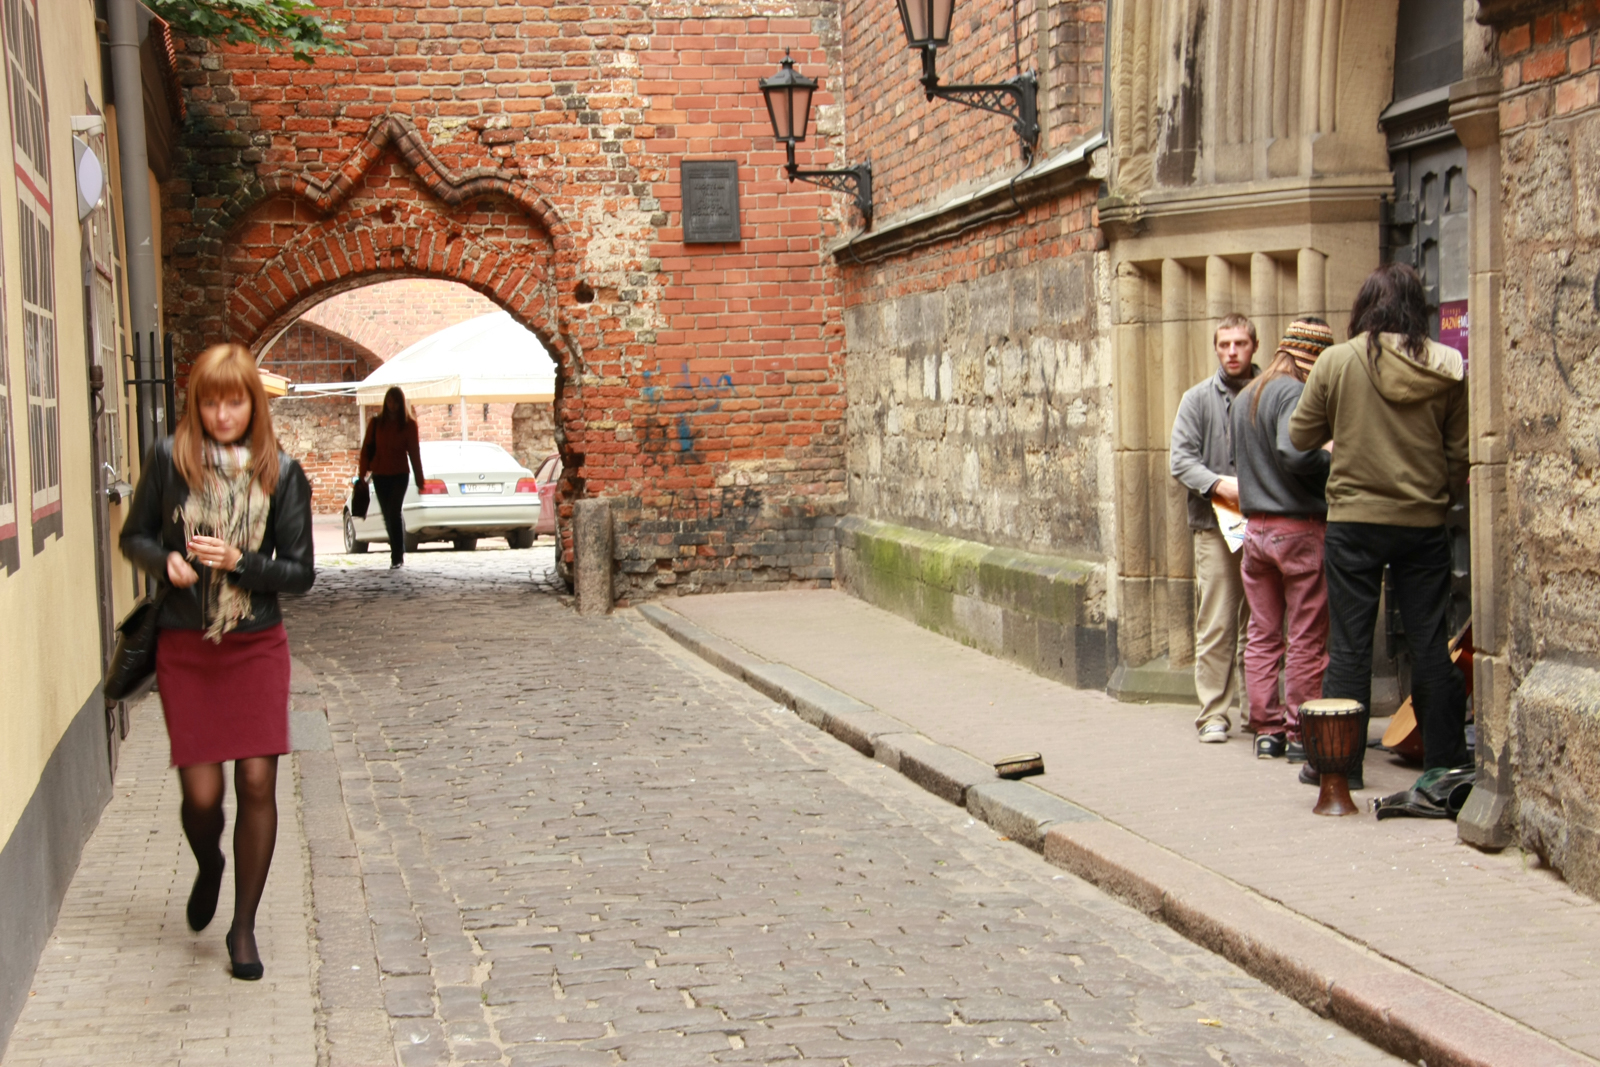
Canon 40D camera, EF-S17-55mm f/4-5.6 lens
aperture f/8, shutter 1/15 second, iso 200
With the camera prepared and the LCD turned off, there’s only a few things to do. First, look for a good shot. As you’re nearing that decisive moment, you can make one minor adjustment: change the aperture to a light deviation for the subject of the upcoming shot, but nothing else. For a good photo, no other changes can be made at this point. It’s too late to do anything else.
No other changes should be necessary if you prepared properly. If you do anything else, you’ll lose the shot: either because the scene will change, or because your mind will no longer be in a creative mode. The result will be a bad shot, or a confused shot that was almost a good one.
As an example, look at this shot I took in September 2008 in Riga, Latvia. I saw the shot coming: the girl was walking briskly towards me, while the young men were across the narrow street from her. I quickly set aperture, ISO, and maybe shutter duration — in those days, I thought I could learn more by manually setting everything.
You can see the exposure values under the photo. I’d say I did alright. However, after all of that, I had little time to focus. The camera on auto-focus, but it focused on the brick wall behind the girl. If I hadn’t wasted time during the moment on settings, I would have noticed that and corrected.
The result is a bad shot. The boy admiring the girl is close to the field of vision, closer to the wall, is almost in focus. But the girl is out of focus by a lot. With her in motion, she’s also blurry. This was almost a good photo. If I had had the camera ready before the moment approached, I could have concentrated and gotten a good shot.
Recap
Again: maybe slightly adjust the lens aperture as the moment approaches. Then point the camera to compose the shot, focus the lens, steady your breathing, and press the shutter release when the moment arrives.
When the moment comes, that’s all you do in the moment: point, compose, focus, breathe, press. Like the carpenter swinging the hammar in the moment, you just swing.