Home Studio Starter Kit, Expansion
writer: russell j.t. dyer; posted: jul 2009; revised: apr 2018
Equipment Mentioned
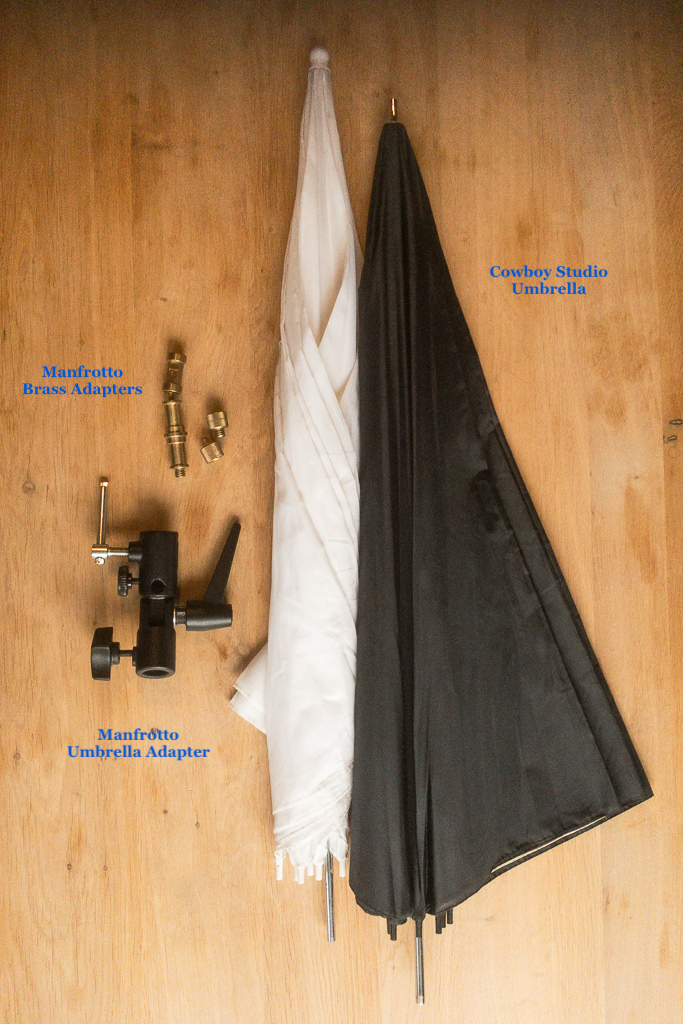
Cowboy Studio 33-inch Diameter Umbrella;
Manfrotto 015 Brass Adapter;
Manfrotto 026 Umbrella Adapter; and
Manfrotto 088LBP Flange Adapter
This is the fourth article in a series in which I explain what equipment a new photography student will need to take good photographs and to learn more about photography. In the previous article, I gave some suggestions of what equipment you will need to move up to the level of studio photography. If you’ve been following along in this series and buying the equipment suggested, hopefully you’ve been taking plenty of photos and have learned a great deal about photography in the process. If you’ve also been reading books and articles on studio photography, it won’t take you long before you’ll want more equipment to be able to do more in your simple home studio. This article addresses that desire and gives suggestions on what to buy next, how to expand your studio with minimal outlay of funds.
A Second Light Source
You can take very good photographs with a single flash. However, with a second light source you can take excellent photos that you can’t take with only one. Of course, you can use a lamp, sunlight from a window, or some other light as a second light source. However, a second flash will allow you more control and will assure that the color of your light sources will be the same, rather than a mixture. Additionally, if you want to learn about studio photography (especially if you are looking to make this a career), you will need to learn how to shoot photographs in a studio with more than one light. To those ends, I recommend you purchase a second flash. In the last article I recommended a medium size flash with slave capabilities. For this second flash, you will need one that has the ability to act as a slave and as a master. It maybe be a little heavier and larger for a compact camera. However, I’m suggesting that you use this flash only in a studio setting with a compact camera. Also, this purchase is going to be part of your gear when you move up a DSLR camera.
When you use the larger, master flash, it will be your main light source. Your smaller flash will be used to fill in shadows that the main light cannot reach. Rather than put the new larger flash on top your small compact camera, I recommend you get a camera mounted flash bracket. If you remember from the photograph of my garage studio in the previous article of this series, I positioned the flash on the light stand slightly to the left of the camera and a foot or so higher. With the camera attached to this bracket and the bracket attached to your large tripod, you won’t need your light stand to put your main flash in the same position. Since this will free up your light stand, you can put your smaller flash on it and then position it to one side of your model. By the way, you could just buy another light stand. However, this Manfrotto bracket is very versatile (e.g., it lengthens and swivels) and you can use it at a party when you can use a tripod and when you want to be mobile.
Attaching an Umbrella
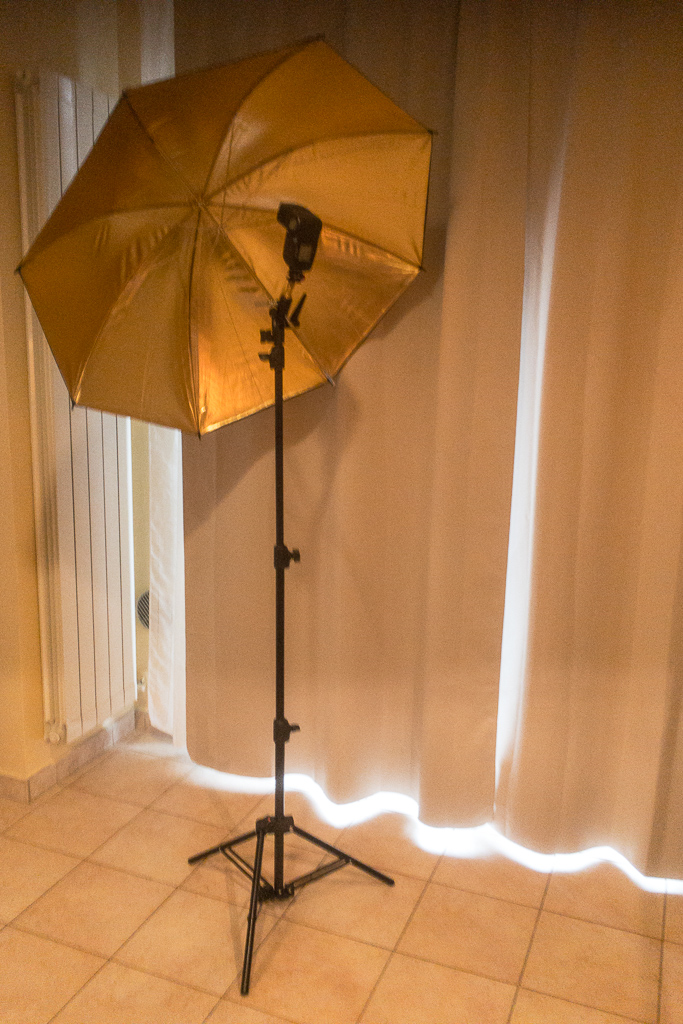
With your new main flash attached to your camera as suggested above, you can put your smaller, filler flash on your light stand. However, rather than point the flash directly at the model, use a defusser: an umbrella will work well. There are two basic types of illumination umbrellas: one that’s white and made for you to shoot the flash through the umbrella at your subject; the other type is made to shoot the flash into the umbrella so that the light will bounce back at the model. This latter type is like the one shown in the photograph here. The inside of some umbrellas are coated with either a silver or gold finish. The result of any kind of an umbrella is a diffused, softer light source. How bright or what color light is determined by which type or coating you use. A larger umbrella will disburse the light more and give you a softer, less concentrated light source. To start, an umbrella like the Cowboy Studio 33-inch diameter umbrella will be fine. It will close and fit easily in your tripod bag. One of the goals of this article and the previous one in this series is not only to help you put together a small, starter home studio, but for this collection of equipment to be able to double as a portable studio. Everything so far is moderately small and lightweight and, therefore, portable.
A Second Light Source
To attach the umbrella and the flash to the light stand, you’ll need an attachment. I suggest the Manfrotto 026 umbrella adapter. It swivels and angles in different directions. It has a small hole to slide the umbrella shaft into and clamp tightly. Be careful not to tighten it too much — you’ll damage your umbrella shaft. Almost all Manfrotto brackets and stands use brass fittings to connect together and for attaching cameras, flashes, and other equipment.
When you attach the small flash, angle it as you see in the photograph here and turn it into the umbrella. The flash will shoot into the umbrella and the light will bounce back at the subject. You’ll notice in this configuration that I have positioned this fill flash to one side of the model at a forty-five degree angle from the camera, as well as a forty-five degree angle pointing down at the model. The main flash is above and a little to the left of the lens. This is a common portrait layout known as a butterfly portrait because of the shape of the shadow formed under the model’s nose.
Minor Items
In addition to the primary components mentioned already, there are a couple of minor items to know about. To attach your flash to the umbrella bracket, you can use the plastic base that came with your flash — the one that allows it to stand on a table (and look like a penguin). The bottom of that has a screw hole the same size as the brass fitting on the umbrella bracket recommended. You call also use the plastic base for your new flash to attach it to the flash bracket that’s attached to the camera.
You will also need either a connector size reducer, a small silvery piece of metal that allows you to change the female connection from 3/8-inch to 1/4-inch in diameter. Your flash may have included one. You can use that to connect the tripod head to the flash bracket. If not, you can begin your collection of Manfrotto brass fittings and other connectors. For this layout I used a Manfrotto 015 brass adapter and a Manfrotto 088LBP flange adapter.
Looking at the photograph on the left of this home studio layout you may wonder where the cable is to connect the flash with the umbrella to the main flash and camera. You don’t need one. The main flash, the master use infrared light signals to communicate with the slave flash. It can change it’s settings and trigger the flash at the same time it fires itself. It’s very cool.
Warnings
Be careful when working with a model: they usually aren’t as worried about kicking over your equipment as you will be. Watch the model when she walks through your studio; hold onto your tripod and tell her to walk slowly and carefully. In the photograph here of me with the small studio layout, I forgot to weigh down the light stand with a sandbag. This is not good. With the light stand extended so high and a flash and umbrella attached — and especially positioned right by the entrance to the room — if I had used a model, she would have knocked that over. So, always use sandbags when using a light stand. In fact, most tripods have hook at the bottom of the center post: attach a sandbag to it, too. You can also use duct tape or something similar that’s known as gaffer tape to tape any electrical cables to the floor so no one will trip on them and yank your equipment. In this small studio set up, we don’t have any cables at this point, though.
Along the same lines of protecting your equipment from damage, make sure you tighten all connection points and that you lock down the base of your flashes when putting them on a light stand or a flash bracket. It’s easy for you to not tighten all the way or to unlock when you think you’re unlocking them. They can slip off easily when you’re trying to configure them. Being at angles they’re difficult to catch when they pop off: I did this to a friend’s flash one time, dropping the flash onto a concrete floor. Luckily by fumbling it while trying to catch it, rather than having it make a direct drop to the floor, it didn’t break or even scratch.
Getting Our Bearing
As you can see in the photograph showing the layout of this home studio, we have the start of a nice set up at this point. The only left that you might want is to get yourself is another book or two on studio photography. Given the gear you will have accumulated so far, though, you can take some great photos and impress your friends. The equipment we’ve select is of solid quality that will last for many years. You could be using the Manfrotto components twenty years later, never outgrowing them and they never becoming obsolete. If you spend a lot of time taking photographs, experimenting and studying photography, you will use everything recommended in this article and the three the precede it. Even if you buy a DSLR camera and buy strobe lights and other studio equipment for a more professional home studio, the items you’ve assembled so far can become part of your travel and portable studio kit. So, shop bravely and enjoy your purchases and the learning process.

