Customizing the Leica Q
writer: russell j.t. dyer; posted: oct 2018; revised: oct 20182
About a month ago, I bought a Leica Q compact camera to replace all of my other cameras and lenses. My plan is to adhere to the one camera, one lens philosophy. This school of thought says that by having only one camera and one lens, you can become more attune to the camera — it’s workings, as well as the pictures it produces. By knowing how close to stand to a subject, how to adjust the camera and lens settings rapidly — all without much thought — and what the results will be, you can take better pictures. If you own several cameras and lenses, you won’t be able to act as intuitively — unless you’re a professional photographer and use all of your equipment daily and take hundreds of photographs each day.
In keeping with the one camera, one lens policy, I intended to buy a Leica M-D camera and a Leica Elmarit-M f/2.8 28mm lens. The Leica M-D is very simple, like a digital film camera. It has very few controls: just knobs for setting the exposure. There’s no LCD or extensive menus to distract or complicate the process of photographing. Even though I will check the LCD, I’ve argued against LCD screens on cameras.
Nevertheless, for portability and some other reasons, I decided instead to buy a Leica Q. This doesn’t mean that I’ve decided in favor of using an LCD screen or more than the most basic controls. I still want to minimize my equipment and how I control it. To do this with the Leica Q, I had o spend a little time customizing the camera.

Leica Q — Left Buttons
Customization
Depending on how you might use the camera (e.g., in a studio or outdoors), you will want to set some things differently. So that you don’t have to fiddle with the camera every time you change settings, the Leica Q has three methods of customization: User Profiles, a Functions Menu, and a Favorites Menu.
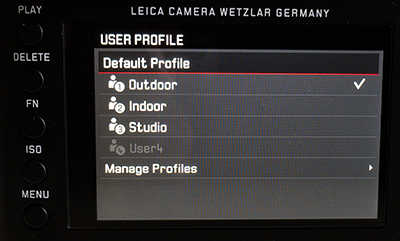
A User Profile contains the configuration of the camera’s electronic settings. You may have four user profiles, four configurations. You can give them a personalized name, if you want. The list of profiles created can be accessed by pressing Menu, then the menu choice, User Profile.
For each profile, there may be certain settings you might want to change depending on the situation. For instance, you may be taking photos outdoors in full sun, but see a scene that’s in the shade and want to change the white balance. Even though you may have the white balance set to Sunshine in your User Profile, you can quickly change it with the Functions Menu, by pressing the button labeled FN to the left of the LCD. The Functions Menu allows quick access to one setting (e.g., white balance), but it can be switched easily to others.
The Favorites Menu is meant to be an easy access menu for the sub-menus you often access. It makes it easier to find what you change occasionally, but not regularly. Any function or sub-menu that’s in the Main Menu may be listed as well in the Favorites Menu.
Leica Q — Customized User Profiles
User Profiles
To create useful User Profiles, you will need to consider how you will be using the camera. In my case, I use it for taking photographs while traveling. That will involve mostly photographing outdoors, but occasionally indoors. For example, I might walk around a town in Italy taking pictures of people and buildings, but may enter a church to take a few photos. I will want to configure the camera for both of these conditions and will want to switch quickly and easily between them. I will also use my camera for taking portraits in a studio. That has its own requirements. I will create profiles for each of these three uses and label them Outdoor, Indoor, and Studio.
The Leica Q has many menus and sub-menus; there are many choices. For each choice, the manufacturer has a default setting. Below is a list of my profiles and the setting choices I made for each. I list only the choices that are important, applicable, or different from the default setting.

Leica Q — AutoFocus Lock
Outdoor Profile
When I know I will be taking photographs outside and during the day, I set the camera to the Outdoor profile. For the settings I chose, I’m assuming that it will be a sunny day, and that I won’t be taking pictures in the shade. However, I allow for changing quickly white balance and related settings based on the particulars of a scene.
AF Mode: 1 Point
Since there may be several people and objects that the auto-focus might lock in on, I prefer to use a single point. I also use the auto-focus lock. It’s accessed by pressing the small black button just order the top right edge of the LCD when the focus point of the screen lights. As long as you continue to hold that button, even if you point the camera elsewhere, the focus is locked.Exposure Metering: Spot
For the same reason I set auto-focus mode to a single point, I want to set the exposure metering on that same. When photographing outdoors, there are many times when the camera will determine whatever exposure setting I have on automatic — which is almost always the shutter duration — based on the focus point or points. So while I’m focusing on a single point, a person, it may set the exposure based on darker items next to that person, unless I set the exposure metering to spot.OIS: On
The OIS is optical image stabilization. It compensates for camera shake. There isn’t much need for it in bright sunlight, but it can sometimes prevent blurry shots. I leave this on for the Outdoor and the Indoor profiles.White Balance: Daylight
When taking photos outside, there will probably be daylight — this is my default setting. I can change this quickly to Shadow or some other setting using the Functions menu.Photo File Format: DNG
Images can be saved as JPG (i.e., jpeg), DNG (i.e., digital negative or raw), or both. The DNG format will allow me later to make changes to the image on my computer that I can’t make with a jpeg image file. I don’t need the camera to save to both formats. I can also easily convert a DNG file to JPG, by not the reverse.Display, EVF-LCD: Auto
This option allows you to activate or de-active the electronic viewfinder and the liquid crystal display. Although I prefer to use the EVF — actually, I prefer to use an optical viewfinder, but the Leica Q doesn’t have one — I can’t resist using the LCD sometimes. This is why I need to get a Leica M-D. I’m still weaning myself off of it.
Indoor Profile
When I’m traveling, I mostly take photos outdoors of buildings and people. Sometimes, I’ll go into a building (e.g., an old church) to take a few photos. For when those moments occur, I switch to my Indoor profile. When I finish and exist the building, I switch back to the Outdoor profile.
AF Mode: Multi Point
When taking photos indoors, there are less unpredictable variables: there aren’t typically strangers walking by who might catch the auto-focus’ attention. Additionally, it’s generally darker and I need the auto-focus to help me pick a focus point. That’s why I put the auto-focus mode to multiple points while indoors. It’s the easiest and sometimes the best choice.Exposure Metering: Multi Point
Since I set the auto-focus mode to multiple points, I usually want the exposure metering for whatever exposure controls are set to automatic, to be based on the average of multiple points — not a single point or the center weighted average.White Balance: Tungsten
When indoors, tungsten or incandescent lights are generally used. Sometimes florescent lights may be used. However, this setting doesn’t matter very much since I’m saving images in DNG file format. That means I can change the white balance in Adobe Lightroom on my computer. It’s just nice to have the images look good on the LCD while taking pictures — especially when someone asks to see the photo I just took of them.
There are a few other options I set, but they’re the same as the Outdoor profile.
Studio Profile
In a studio, when taking portraits of a model, the variables are limited and predictable. First, I control the lighting with strobe lights and reflectors. I might also allow or use natural lighting from a window, but it’s usually filtered in some way — perhaps with sheers on the windows. Besides lighting, the model is generally stationary and posing. And sometimes I use a tripod to keep the camera steady. Because of all of this, I can tighten the camera settings.
Display, EVF-LCD: EVF Extended
For studio work, I always use the electronic viewfinder and don’t want to be distracted by the LCD. However, for when I want to make sure that I’m focusing correctly, I can see the image I just took in the viewfinder or I can press the Play button and the LCD will activate showing me the photo. With the LCD, I can zoom in by turning the black knob at the top right&mndash;the one that’s usually for exposure compensation — and nagivating with the Direction Pad.AF Mode: 1 Point
When I take portraits, there’s usually only one model. So auto-focus can be set to a single point.MF Assist: Auto Magn. & Focus Peaking
Although the automatic focusing system on the Leica Q is excellent, I can focus manually on the precise point of the model (e.g, her eye closest to the camera). In using manual focus, though, I need the image in the viewfinder to be magnified. So I set MF Assist for this. Incidentally, with manual focus, the auto-focus mode set to 1 point means that I will get a confirmation light when I am in focus.OIS: Off
Image stabilization attempts to compensate for camera shake, from the photographer shaking the camera when taking a picture — either from his hands shaking or maybe just the motion caused by pressing the shutter release button. On SLR cameras, the mirror flipping up and back down can cause camera shake. Image stabilization can compensate for all of this. However, when the camera is on a tripod and I’m using a shutter release cable, there is no camera shake. The result is that image stabilization is compensating for nothing and introduces its own camera shake. Even if I don’t put the camera on a tripod, when using bright studio lights, the shutter duration will be something minimal, between 1/60 to 1/500 of a second. So I set OIS to Off.Continuous Shooting: High
Sometimes I will ask a model to move while I’m shooting, either to catch her in a more natural pose or to photograph her hair in motion. This can yield some good shots and relax the model — especially if she’s not a professional. For those moments, I set Continuous Shooting to High.Flash Mode: On
The Leica Q doesn’t have a flash, but this setting activates the flash hot shoe on top of the camera. I’ll attach to it a PocketWizard remote flash trigger.White Balance: Flash
Again, since I’m using DNG, the white balance doesn’t matter in the camera, but since I know I will set all of those photos to this in the end, I may as well set it the White Blance to Flash from the start.Photo File Format: DNG + JPG
A few years ago I spent a day with Matthew Osborne, a professional portrait photographer in England that uses Leica rangefinder cameras. He gave me private lessons on how to use my Leica rangefinder cameras in a studio. I learned from him that to be assured that the images are clear, to save images also as black and white jpeg files. The camera will then show on the LCD a black and white image from those jpeg files.JPG Settings, Saturation: Monochrome
This is the option to get black and white images in LCD. It’s in the main menu. Under JPG Settings there is a sub-menu for Saturation. Set that to Monochrome.JPG Settings, Sharpness: High
I set the jpeg sharpness to high just for better images in the LCD to check that my shots are in focus. This setting has no effect on the DNG image files.JPG Resolution: 0.5 M
Since I want the jpeg images only for when taking pictures and will discard them later and use the DNG image files instead, I don’t need a high-resolution jpeg image and don’t want to fill my memory card with the jpeg image files. Plus, the camera can save small jpeg image files faster. This is particularly important when continuous shooting, as I do sometimes in the studio.
I don’t set the exposure metering. That’s because I set manually the lens aperture, shutter duration, and ISO sensitivity when taking pictures in a studio.
Leica Q — Customized Functions Menu
Functions Menu
The button, labeled FN can be configured for any function or sub-menu from the . For instance, maybe you sometimes want to us the timer for the shutter release. There’s a menu for that with three choices: off, 2 seconds, and 12 seconds. If you make that the default for the menu, when you press FN, you’ll see these three choices. You use the direction pad to click through the choices.
By holding down the FN button for a couple of seconds, other functions and sub-menus are revealed. You can choose which functions and sub-menus are in this list by going to the and clicking on Customized, FN Button.
You can have a different menu for each . For my Outdoor and Indoor Profiles, I’ve set the menu to include Exposure Metering, Self Timer, and White Balance as the default (see screenshot here). For the Studio Profile I have only the Self Timer. I don’t need to change anything else in the menus when I’m in the controlled setting of a studio.
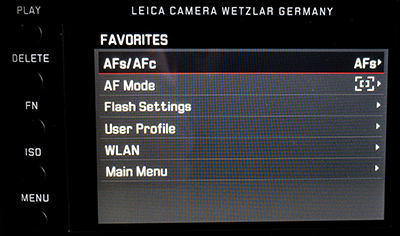
Leica Q — Customized Favorites Menu
Favorites Menu
The has five pages of the choices, and some choices lead to sub-menus of more choices. If there are things in the that you occasionally change, finding them while in the midst of a photo shoot can be frustrating. To resolve this problem, starting with version 3.0 of the Leica Q firmware, the has been added. You can put in the anything that’s in the you use often.
When you press the button to the left of the LCD, the is displayed. If you press a second time, the is displayed. Prior to version 3.0, there wasn’t a , so only the would be shown. If your Leica Q camera is using the older version, you should update the firmware to be able to use this feature and several others improvements.
Just like the , you can have a different for each , although I don’t. Below is what I have for the of all three of my .
AFs/AFc
Auto-Focus Single or ContinuousAF Mode
Although I have a default preference for this setting, I may want to change it for certain situations. The choices are , , or . I also have this sub-menu in the for my Outdoor and Indoor Profiles. I probably should eliminate it from the profiles and put it in the of my Studio Profile.Flash Setting
This sub-menu I use only with the Studio Profile. It is possible that I may sometimes use it with the Indoor Profile, but I haven’t yet. If I ever do, it will be easy for me to find it since I’ve included it in my .
Summation
It takes a while to set all of these items, but that’s the point of doing them in advance and saving them to User Profiles. If you have to make these changes while out shooting, you may forget to do some of them, or you won’t do them, or you’ll try to do them and be so distracted that you’ll miss your shots — or at least not take as good of a picture. Once you’ve created the User Profiles you need and become familiar with them, come to trust them, you’ll be able to switch between them, and make minor adjustments with the Functions menu as needed, so that you’re able to stay focus on creating good photos.