Adjusting Aperture for Light or Depth
writer: russell j.t. dyer; posted: aug 2009; revised: apr 2018
As mentioned in the overview article on this site, Understanding Exposure Settings, there are basically three main settings in a typical digital camera related to exposure: shutter duration, aperture, and ISO sensitivity. The aperture may be set from your camera, but is actually the internal opening of the lens that controls the amount of light that passes through the lens into the camera. It controls the amount of light to which the camera’s image sensor is exposed. The word apertura in Italian means opening. The word camera in Italian means room. So a photographic camera is a very small room or confined space for photographing images. That sense of the word camera was probably more obvious when cameras were huge and had a black cloth on the back end that the photographer would stick his head into. The aperture is the opening to that otherwise dark room we call the camera. Knowing these words can sometimes be helpful in understanding the concepts behind them.
Aperture & Exposure
Setting the aperture, therefore, is adjusting the internal opening of the camera lens. The bigger the opening, the more light that will enter the camera and the brighter the resulting photograph. The smaller the opening, the less light and the darker the photograph. If you’re indoors and there isn’t much light, you could widen the aperture to allow more light to enter the camera. If you’re outside and it’s very bright, you could narrow the aperture to reduce the amount of light that enters. This is simple enough when said this way. However, new photographers don’t always remember or realize this because when they’re using a camera, if it’s on automatic mode, the aperture is set for them: it just happens. When they’re using a camera in manual mode, you’ll have set the aperture narrower in a dark room (e.g., between f/4 to f/2) and to a maximum setting when outdoors in full daylight (e.g., f8 to f/16).
Depth of Field Comparison
These photographs were all taken with a FujiFilm X100F camera — which has a 23mm fixed lens — on a manfrotto tripod. Only the aperture was changed manually and the shutter duration automatically. Everything else was the same for all three shots.
For all three photos, the single focus point was a lone lemon located almost in the center of the image, to the right and further back from the main cluster of lemons. If you click on any photo, you’ll see a much larger version.
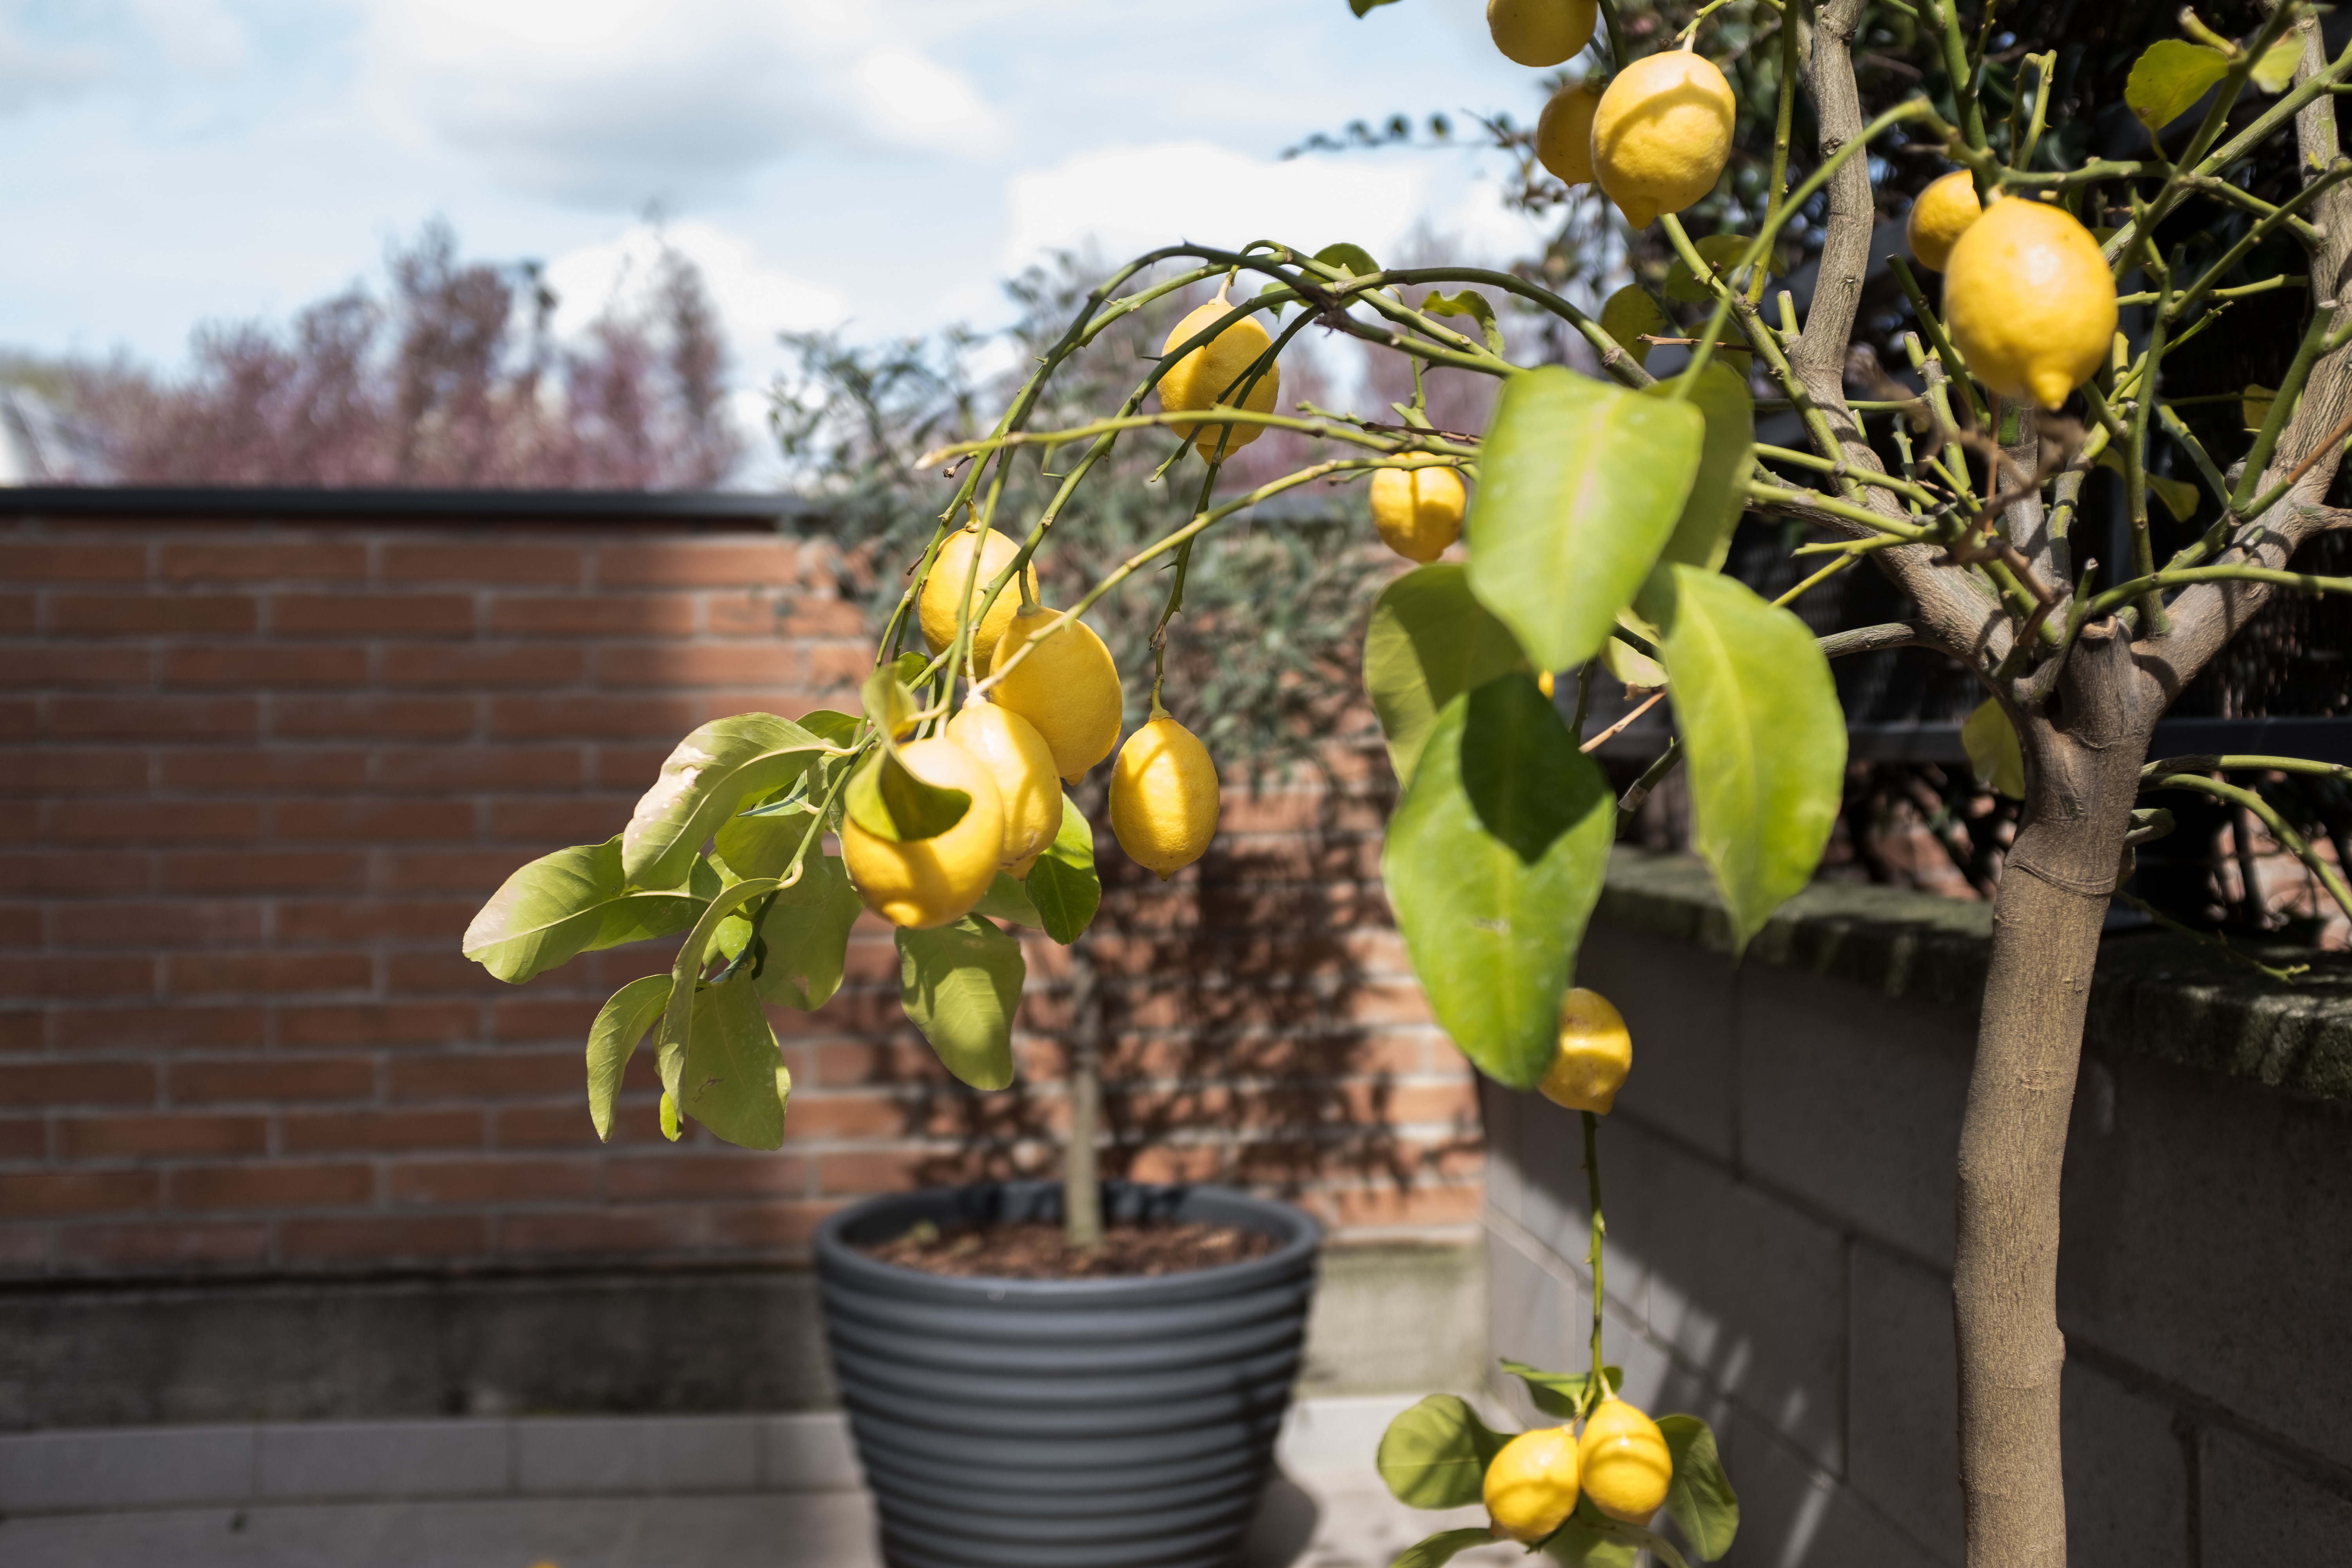
In this shot, the lens aperture was set to f/2. Notice that the lone, center lemon and the trunk of the lemon tree are in focus — this is because they’re they’re the same distance away from the camera. You’ll also notice that the leaves that are closer to the camera — there are a cluster of five — and the small olive tree and wall in the background are out of focus. They’re all fairly blurry.
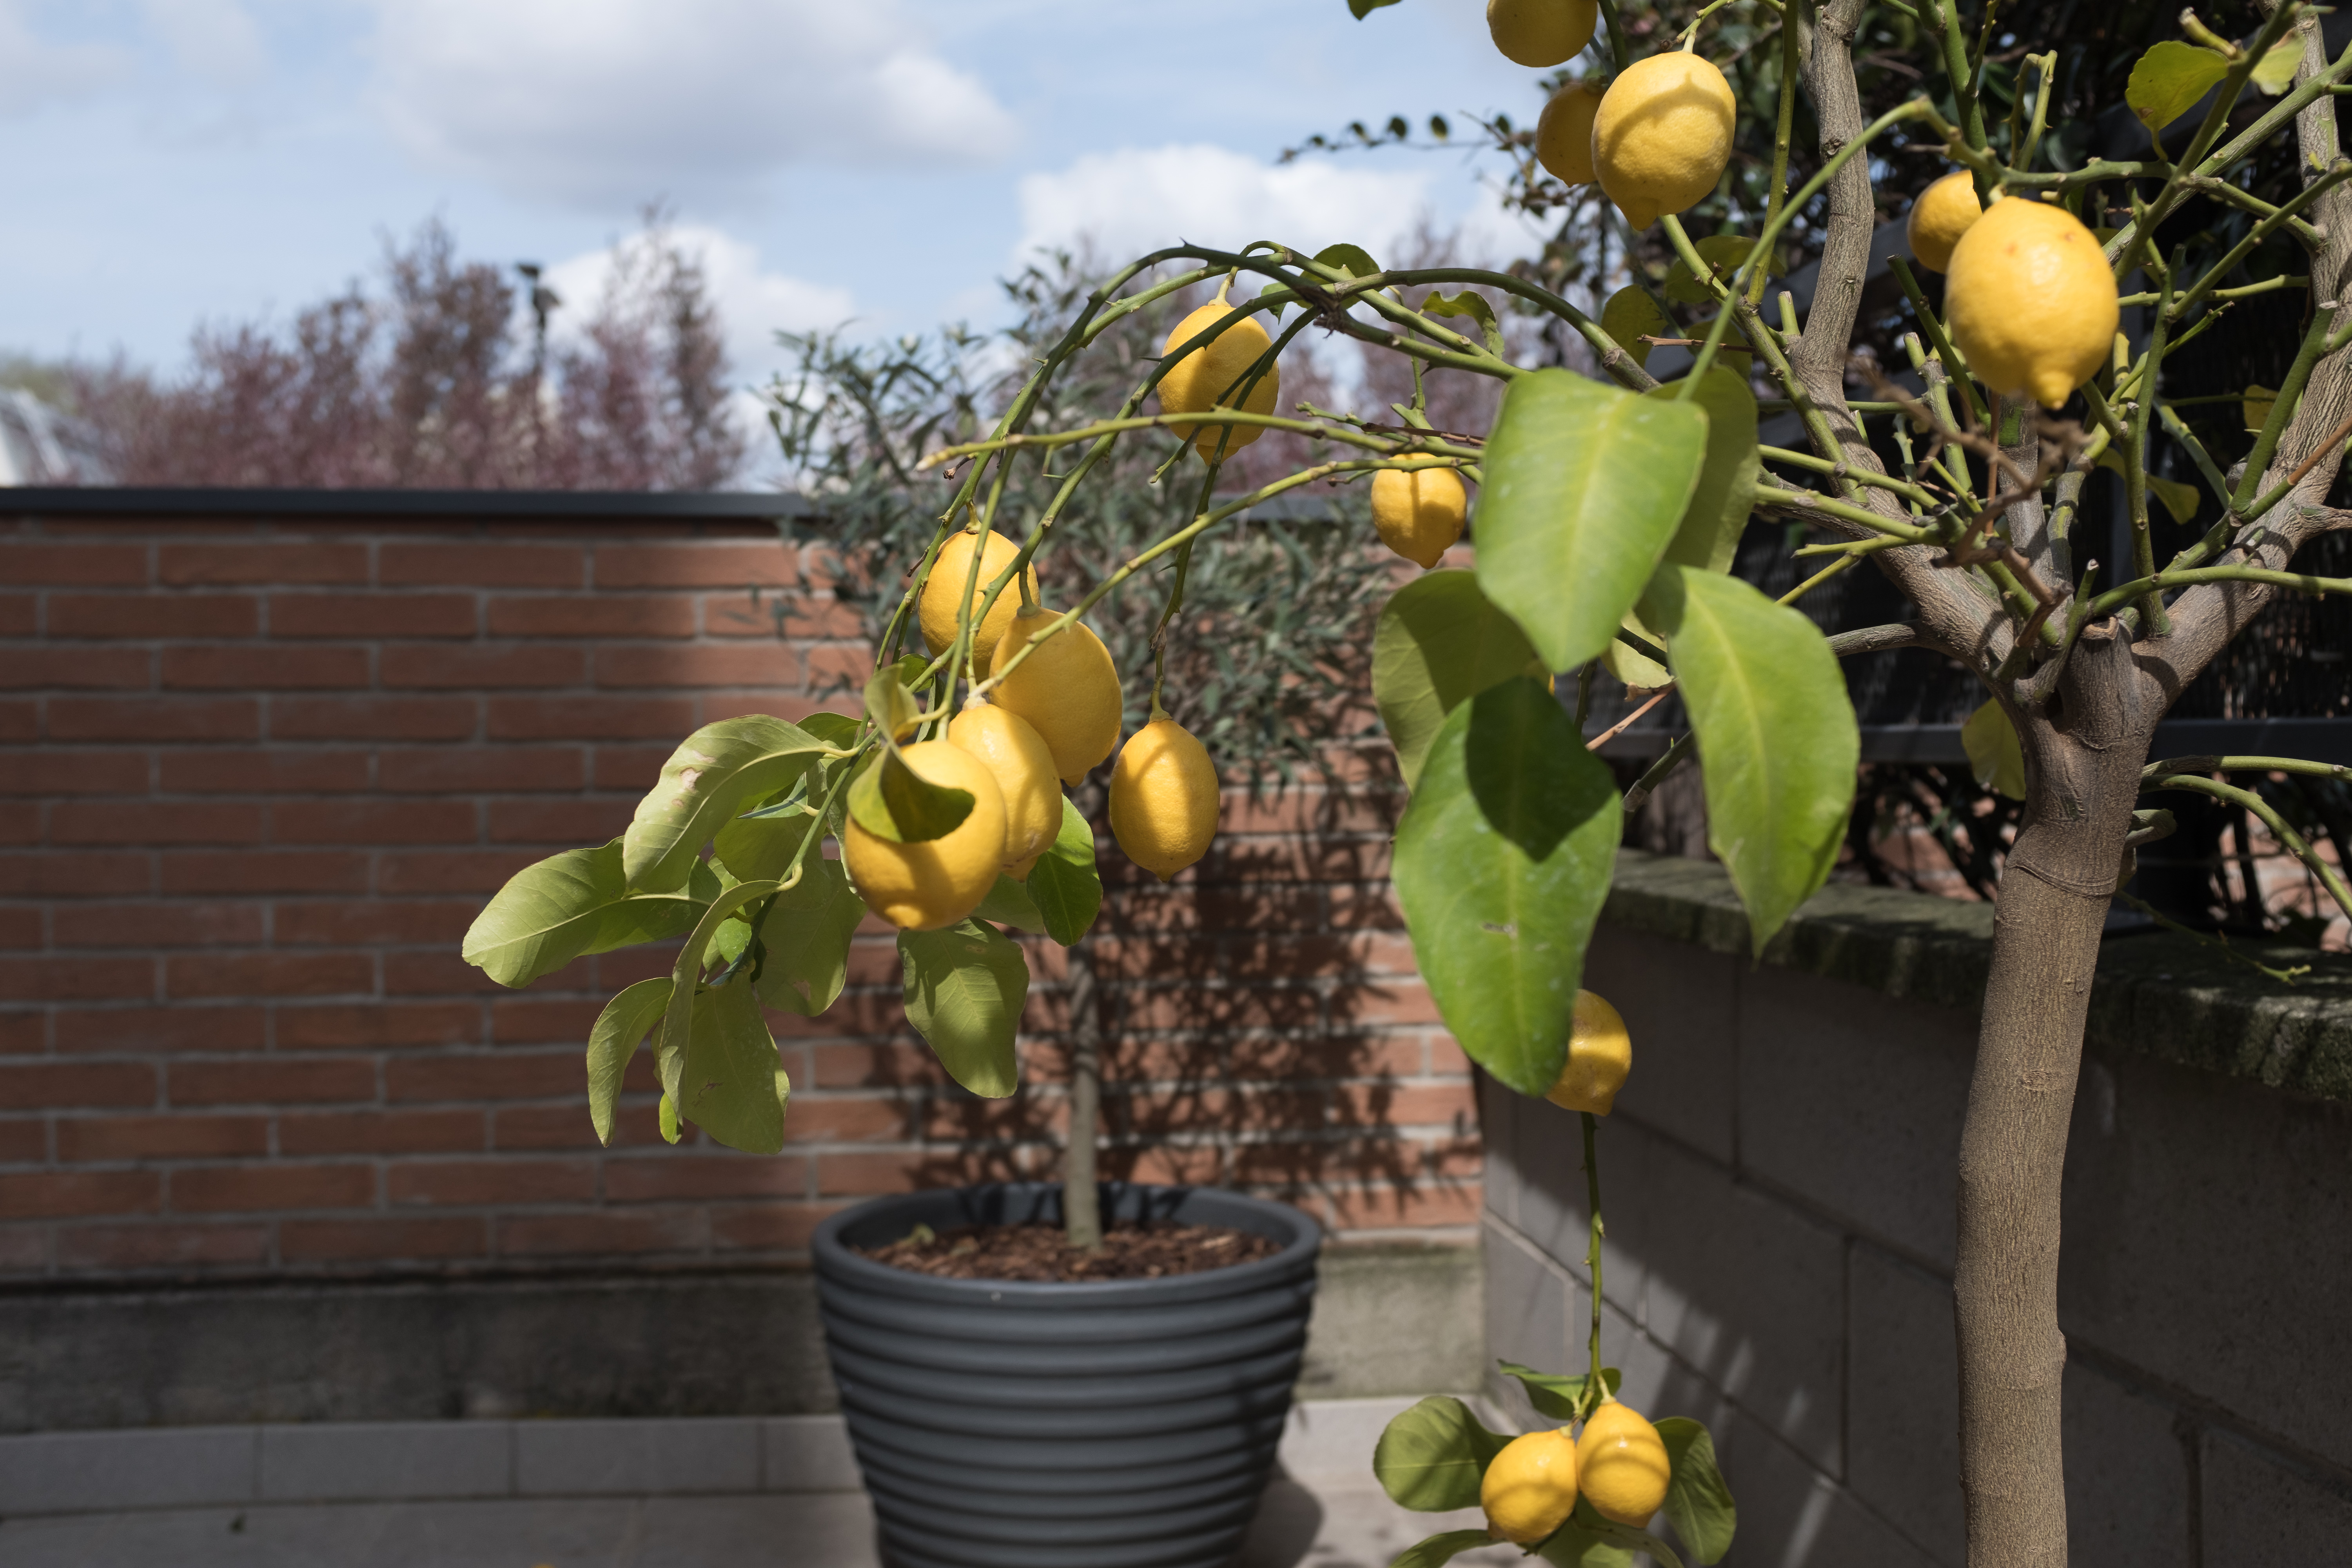
For this second shot, I changed the aperture to f/4, without making any other adjustments to the camera or lens. The lone lemon is still in focus along with the trunk. However, the cluster of lemons to the left and the pair hanging low are almost in focus. Two of the leaves in the foreground, the two whose undersides are facing the camera are now in focus, although the three that are closer to the camera are still fuzzy. Notice that the olive tree and wall behind it are clearer than in the previous photo, but still out of focus.
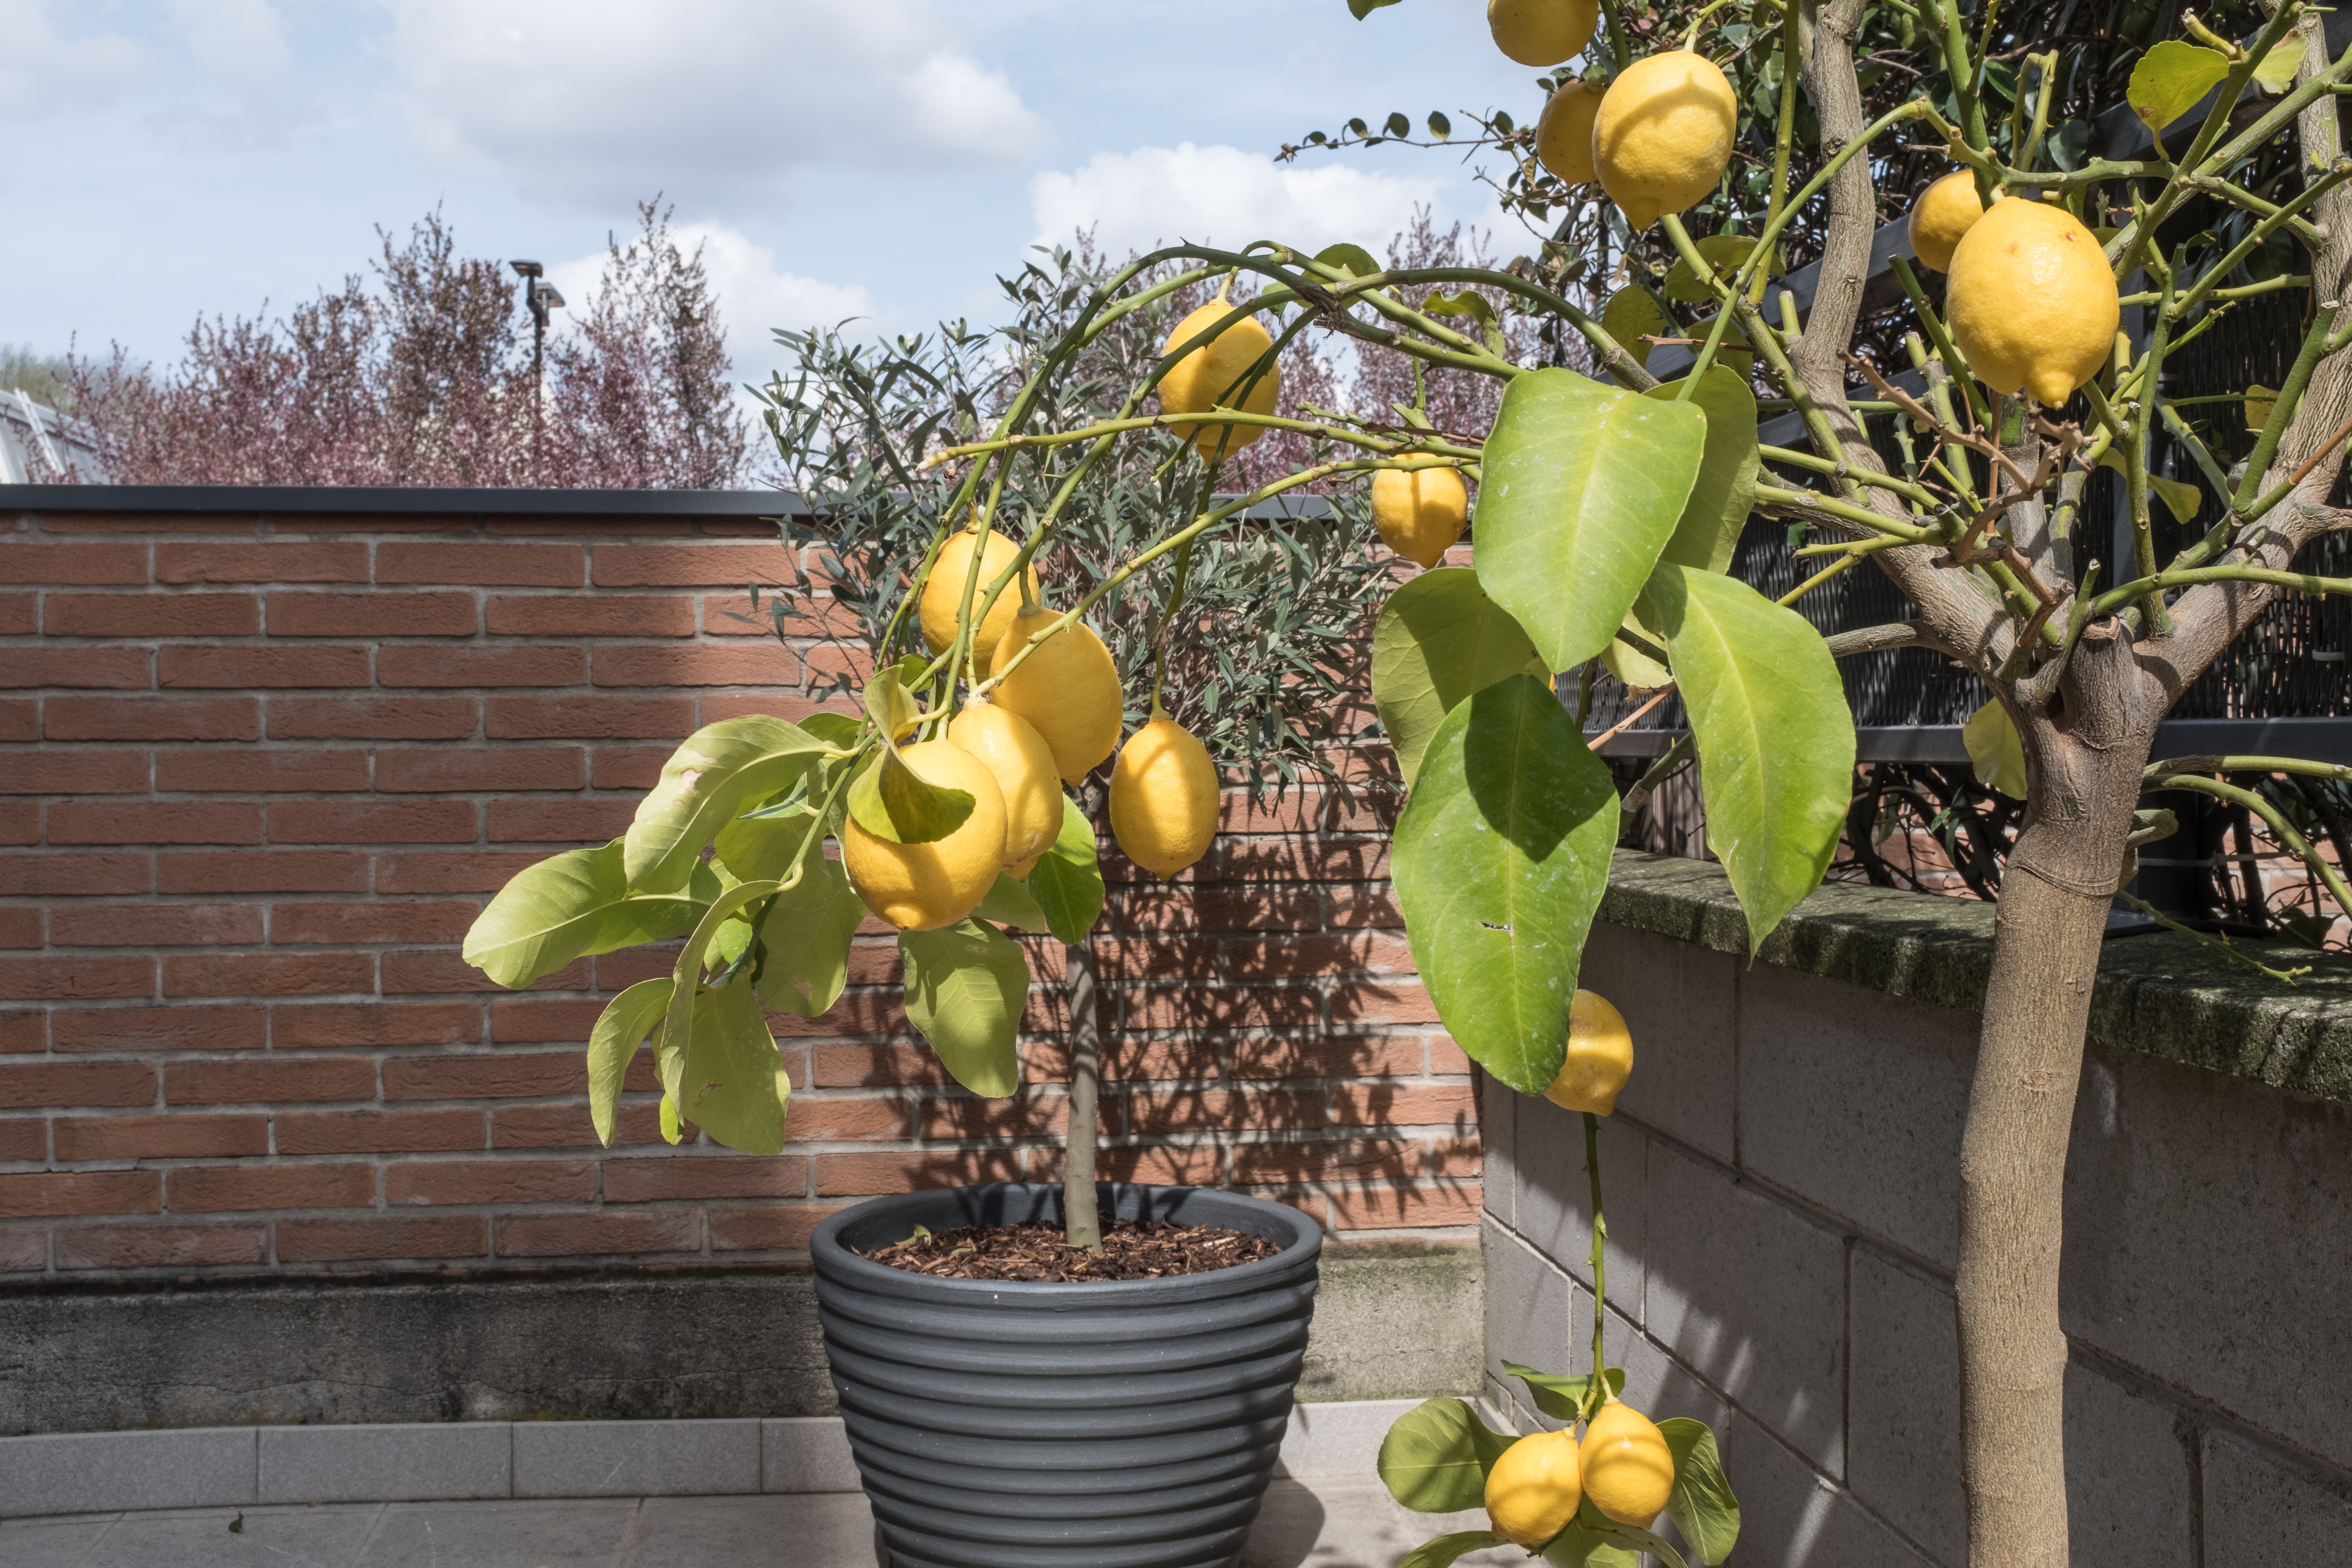
This last shot was taken with the same settings and position, but the aperture was set to f/16. Now all lemons, leaves, branches and trunk are in focus on the lemon tree. Most of the olive tree in focus and the wall is almost in focus. You can even see some clarity in the pink blossoms of the tree far behind the wall.
Understanding f/numbers
Another aspect of aperture that can confuse a beginner is the numbering system and the way it’s abbreviated. Aperture settings are generally labeled with the letter f followed by a slash and then a number (e.g., f/4). This number increases as the opening is narrowed and decreases as it is widened. You don’t need to understand the mathematics of this number. However, in case you want to know I’ll try to explain the basics — skip to the next section if you’re not interested.
As I said, that the aperture notation includes a slash. That’s because it’s a fraction. Aperture values are somewhat universal, fractional notations for different size lenses — lenses with different focal lengths and lenses with different diameters to their openings. For example (but a totally different matter), suppose you have two containers. One can hold 10 ounces of liquids and the other 100 ounces of liquids. The first one has 5 ounces of water in it and the second one has 50 ounces of water in it. Despite the differences in sizes and contents, they both are 1/2 full. Fullness is a universal measure based on the capacity of the container and the amount that it contains.
With lenses, you take the focal length of the lens (e.g., a 50mm prime lens has a focal length of 50mm) and divide that number by the diameter of the opening or aperture of the lens. Let’s say you happen to have your lens opening set at 12.5mm — a number you won’t find on your lens or camera, by the way. The formula for aperture fullness is focal length of the lens divided by the diameter of lens opening: f/d. In this example, 50mm / 12.5mm. This equals 1/4; the opening is one-fourth that of the focal length. In aperture notation, it’s written f/4. Swapping numbers about and applying it to an 80mm lens, with an aperture set to f/4, the diameter of the lens opening is 20mm.
You don’t need to know the diameter of the lens opening, though. It’s not important how many millimeters wide you set your lens because whatever it is, the cone of light starting at the aperture and entering the camera (thanks to fine engineering) is going to narrow down to the dimensions of the image sensor (with a bit sliced off around the edges to make it rectangular) at the back of the inside of your camera — this is why you have to use a lens which was designed for your camera.
To minimize confusion and so as not to concern ourselves with the diameter of the internal opening of the lens and then have to remember to consider that in relation to the focal length of the camera — which can be even more confusing with a zoom lens — we have this simple number, known as the aperture setting or f-stop. We use the f-stop to compare settings across all lenses in relation to image sensors — in relation to exposure of the image sensor. The value of understanding how the f-stop numbers are determined, though, will help you to understand why the wider the aperture, the smaller the number. Considering that 80mm lens again, with the aperture set to f/4 the diameter of the lens opening is 1/4 of 80mm, or 20mm. With the aperture set to f/8 the diameter of the lens opening is 1/8 of 80mm, which is 10mm — a smaller opening. The number that’s increasing when increasing the f-stop is not the diameter, but the denominator of the equation, the amount by which the diameter of the aperture is divided. So, of course the results will be smaller. It would be much easier for newcomers to photography if we just said to set the lens opening to one-fourth or one-eighth.
Depth of Field
The size of the lens aperture does more than determine the amount of light that’s exposed to the camera’s image sensor. It also affects how much in view of the lens is in focus. If you ‘re at a party and you decide to look at someone (say a beautiful young woman) in the middle of the room, your eyes will focus on that woman. That woman will be in focus. People and things in front of her will be out of focus. People and things behind her will be blurry, as well. You probably won’t notice that they’re out of focus because you’re looking at the pretty woman. If you were to glance at someone behind her, your eyes would rapidly focus on that person, so fast that you wouldn’t even realize it happened. Still, objects past the pretty woman and in front of the pretty woman are probably out-of-focus when you’re staring at her. She is in range or within your field of focus. If you could consciously open your eyes wider, or rather your pupils wider, you would be able to focus on the young man in front of her looking at you angrily — her boyfriend. In this process of widening your eyes to be able to focus on her and him simultaneously, although they are not standing next to each other, you have increased your the depth of your field of focus, the depth of field. In the same way, when you increase the lens aperture on a camera (i.e., change the f-stop to a lower number), you increase the depth of field for your shot.
If someone were to use a fine tip marker to draw a picture on a piece of paper, but do so with dots that are close together and not lines — much like a connect-the-dots drawing — and then ask you to look at the drawing while squinting your eyes, you’ll notice that the dots will begin to take shape and look more like lines than dots. The brain will fill in the space between the dots and see a picture. The same thing happens with respect to looking at a photograph. The brain will accept a certain amount of fuzziness and fill in the missing dots or pixels.
The depth of field is the range of objects or images which are close enough to the focus point so that for our brains will smooth over those images to seem in focus. Whatever exact point of an object is in focus (the lone, center lemon in the example photos on this page), everything in front and behind it is not in focus. However, a little in front of it and more behind it is good enough and we consider it in focus.
When you set the lens aperture to a narrower setting, a higher f-stop number, the depth of field will increase. When you set the aperture to a wider setting, a lower f-stop number, the depth of field will decrease. Basically, with a narrower aperture less light gets in so the shutter may remain open longer and thereby allow the image sensor to imprint longer, allowing for more clarity in the final image. So, if you want to shrink the depth of field, widen the lens’ aperture and reduce your camera’s shutter duration, accordingly. If you want to increase the depth of field, tighten the lens’ aperture and increase your camera’s shutter duration.